Blue Christmas
This morning I am trying to finish up all my gifts, at last count I’ve still got five in various stages of completion, and one that is not yet started at all. I was up till 2 last night working on them, and I think it’s safe to say there will be a few more late nights.
I came across this video today (Thanks Lyndi!), and it might just be my favorite Christmas song ever. Blue Christmas, by First Aid Kit.
I’m also listening to Sufjen Stevens, Bright Eyes, Johnny Cash and Elvis Christmas Albums. What is your favorite Christmas music? And how much do you have left to do before Saturday morning!
I’m Dreaming of…
Last night we went up to the Sundance Ski Resort for dinner. It was terribly romantic. We sat at a small table in front of a cozy fireplace, tucked in next to the window where we looked out on the most beautiful snow. It rained at home most of the day yesterday, but up in the mountains the snow was piling up. And by the time we got home the snow had made it to the valley, and everything was dusted with beautiful white.

I went to bed happy and content. And when I woke up this morning we had at least six inches of beautiful new snow, and it was still coming down. It has been one of the most wonderful days ever, and only going to get better. Scott is home from work early and as soon as Creamie wakes up from her nap we are going back outside to throw snowballs and go sledding. Now, if only it will stay cold enough the next few days so that we can have a white Christmas.
Love
“Love is a temporary madness
it erupts like volcanoes and then subsides.


A New Dress
Several months ago I saw this dress and immediately fell in love. And a few days ago we were out shopping and I saw it again. On Sale. In my size. I was sure it was a sign, and we brought one home. But it is just so perfect, and now I want three of them.

I decided on blue, but it is much deeper and moodier than this pic shows. It’s such a deep dark beautiful color. And really, could this dress get any more perfect? I love the Jackie-O look, with the pleats, the neckline, the belt, I just LOVE it. But the best part? It has two pockets! I’m in love.
Scott told me I am supposed to wait until Christmas to “open” it. But I’m pretty sure I’m going to wear it to dinner on Monday. It’s our anniversary and he’s planning a surprise…(and by surprise I mean that I know he’s doing it, that we have to leave our house no later than 6:00 pm, and dinner will be involved. And dessert, because I’ll be there to make sure that happens.)
Gingerbread Doughnuts
A few days ago we went to Krispy Kreme after dinner so Creamie could watch the doughnuts being made. For only having two or three doughnuts in her short life, she sure is in love with them. And, truly, what is not to love about a warm doughnut.

I got a gingerbread doughnut. It was probably the most delicious thing I have purchased for under $1 ever. You must go get one before this season is over! It was to die for delicious.

Creamie was having a hard time with all the stickiness on her fingers. So she did what any motivated one year old would do, and got creative. She is so funny it kills me.
A Handmade Christmas Archives
Here is a quick roundup of all the posts from my Handmade Christmas project. I had originally planned on twelve, but I ended up with thirteen. Thirteen is my favorite number, and I don’t think you can ever go wrong with a Baker’s Dozen of anything. Click on any picture to go to the original post!

Paper Christmas Tree Advent Calendar

Gingerbread Boys to eat or hang on the tree


Felt Plushie Peppermint Ornaments


Needle Felted Mitten Tree Topper


Chocolate Peppermint Cake guest post at Bright Yellow World

How to Make a Gingerbread House

Thanks for joining me for A Handmade Christmas. May your days be Merry and Bright.
Spreading Christmas Cheer
So, my camera is on a business trip with hubby. And I am surprisingly unmotivated lately to do much of anything. But, there are two important things you should know. Ok, three.

#1- The best way to battle winter doldrums is with pink boots. Seriously. Today is the last day to win this pair of pink rainboots from The Shoeologist. But don’t go over there, these have my name all over them.

#2- My best friend is trying to win Christmas dresses for her four little girls. (She was my partner in crime this summer for the Pinkalicious party. She also moonlights as a princess. She goes to birthday parties to make girl’s dreams come true, and earlier this year she planned a HUGE party for kids with incurable diseases. She did it all through facebook. She’s wonder woman!) She is in the top five currently, and if you’d go help her out a little, that would be great. If there is anyone in this world that deserves cute dresses for their children, it’s Linsey. If you want to help her out, go to the Persnickety Clothing Company’s facebook page and like it. And then leave a post on their wall saying Linsey Holley sent you. At the end of their contest, the person who sent the most people over will win free clothes. And her girls deserve it. Really.

#3- My friend TraceyJay is starting a new project called Quilt Hope In. It’s a new etsy shop for donated items to be sold to benefit Heartline Ministries, a group in Haiti that is serving women and children. Nothing beats spreading cheer like helping those who truly truly have no one else.
So, go do something good. Do good for yourself and win some boots. Do good for Linsey and help her get four Christmas dresses, and do good for the world with a quilt.
A Little Christmas Shopping
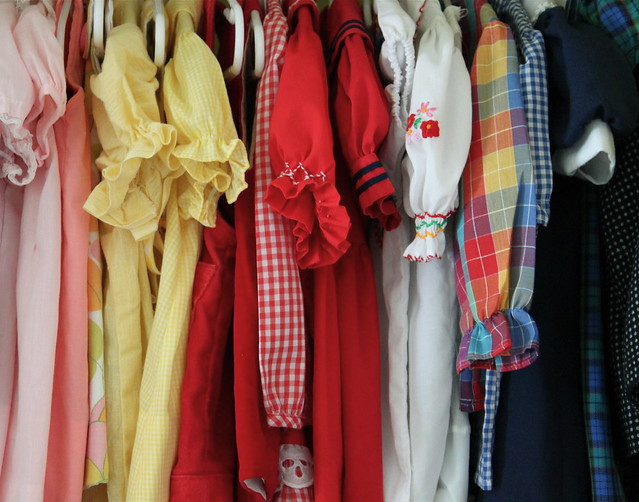
Today I went to a thrifting for the first time in a few weeks. Those Handmade Christmas posts kind of sucked up all my time for a while. But today was seriously awesome. I found several cute little vintage dresses that kind of made me die inside. There is no way that Creamie is going to wear all the dresses that I brought home (ahem, um $40 in vintage girls clothing later, ahem, cough).
[ Rachel‘s collection of gorgeous vintage dresses for her little Ruby. ]
I am seriously considering starting an etsy shop next year so that I can buy all the beautiful old things I love without having to really figure out what to do with them. That way I can still have the thrill of finding and bringing home all those amazing treasures. And I can photograph them and love them and hold them for a while. And then I’ll be ready to let them go to someone else who will love them as much as I do. (I have a great story to tell about this. Later.) I’m pretty sure it’s a no fail plan. I’ve already got a stack of things that I know I don’t have room to keep, but that I couldn’t just leave on the shelf/rack. So tonight while it was on my mind I started sifting through etsy drooling over looking at dozens of beautiful vintage items and I found this dress. And I audibly gasped.

And I’m so in love it’s ridiculous. Look at those cute buttons on the back, and it has pockets! Such a gorgeous 1950’s dress. And that skirt! Ivory wool with sparkles and red and green flowers? I die.

I wish I had a fancy Christmas party to wear it to. (And an extra $350 dollars in my piggy bank.) So since I don’t have either of those, I’ll just look at it and show you and you can appropriately ooh and aah and I’ll pretend that is just as good. But really, this is nearly the most perfect dress in the world. Really.
PS- This dress is at Etsy shop Timeless Vixen Vintage. In my opinion she has the most beautiful vintage dresses on the internet. (This one also made me gasp.) Sigh, I want to have her job. Sigh.
A Little Mistletoe
Its’ the last day of A Handmade Christmas , and for my last project I am sharing a little DIY mistletoe love. Because who doesn’t need more kisses in their life?
Growing up we had mistletoe hanging in the kitchen doorway year round. I absolutely loved it. A few days ago I got this idea, and I am so excited about how it turned out! But the best part about it? I already had everything I needed on hand. I love a free project!

This is made from a little wool felt, a few felted balls and some vintage velvet ribbon. I attached mine to a headband, but you could turn it into a brooch, or a hairclip as well.

I had some creamy wool roving that I turned into felt balls (here’s a similar tutorial on how to do that), but you could use little mini pompoms, or buttons, or pearls. My little balls are between 1/4″ and 1/2″ across. I only used about a half inch of roving for each one, and I let them dry overnight before I started this project. Whatever you use, make sure it’s an odd number.

Cut 4 or 5 circles from green felt. Mine are about 4 inches across, I used a drinking glass as a template. Then cut each circle into a flower shape to make the mistletoe leaves. Fold each flower into thirds of fourths. Use a scrap of felt for the base and stitch the leaves on covering up your stitches as you go. Continue adding your green felt flowers until you’ve got a good little pile of leaves.

Using matching thread, stitch the felt balls (pom poms, buttons, pearls) onto the leaves, making sure you go all the way through to the backside so everything is secure. I ran the needle through the bead, and then went back the other way, so I had a tiny little indent on the ends of each wool bead, kind of like real mistletoe.

After you’ve stitched on your berries, add a cute little bow. I used vintage velvet ribbon that my mom gave to me. I am pretty sure that it was a scrap left over from her wedding.

Next trim your base scrap of wool down and hot glue it to a headband (or a pinback or a clip). Then cut another piece and glue it on the opposite side of the headband to cover up all those little edges, and hide the stitches, the glue and the headband.

And in just 30 minutes (aside from making the felt balls) you’ve got a festive hairpiece to wear to a party!

Now wear your handmade mistletoe with pride. And pucker up. There are kisses to be had.
How to Make a Gingerbread House
Yesterday (was that really only yesterday? Sheesh, it’s been one of those days.) I posted pics of Creamie’s little gingerbread house, and today I finished up mine. And finally it’s ready to post. Day eleven of A Handmade Christmas is all about making your own gingerbread house. But you don’t have to make yours pink. The other colors are fine too. Me? I HAd to make mine pink.

Roll up your sleeves, this is going to be fun. Let’s start out by making your gingerbread dough.
Gingerbread House Recipe
NOTE: This is not the same as the recipe for gingerbread boys. This dough is a lot stiffer and stronger when it cools, making it ideal for holding up a house loaded down with candy. The gingerbread boys are a much softer cookie.
1/2 cup oil
2/3 cup molasses
1/3 up brown sugar
1 egg
2 3/4 flour
1/2 tea salt
1 tea ginger
1 tea cinnamon
1 TB baking powder
Combine dry ingredients in the sifter, set aside. Measure out your oil first, and after you’ve dumped it into a mixing bowl, use that same cup to measure your molasses. The oil will help the molasses slide right out of the cup without leaving a sticky mess. Mix the oil, molasses, sugar and egg well, then add the dry ingredients from the sifter. Mix well. Cover and chill overnight in the fridge, or for 30 minutes in the freezer.
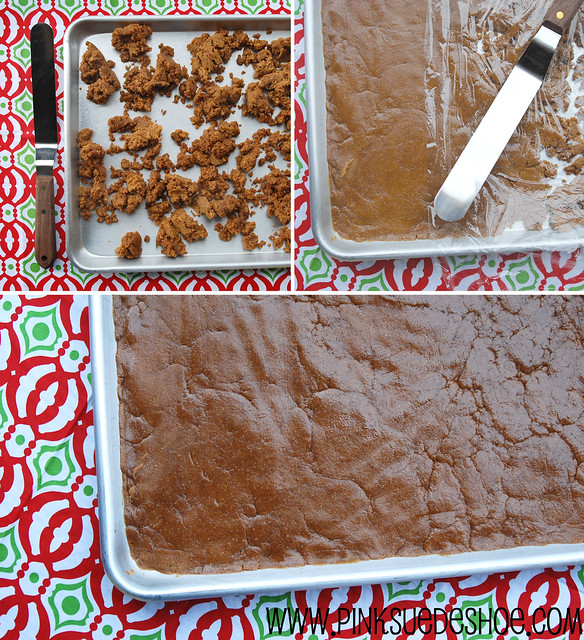
Spray a rimmed cookie sheet/jellyroll pan with nonstick spray. When your dough is chilled, spread it out on the cookie sheet. Cover the dough with a piece of plastic wrap and use your fingers, a small rolling pin or an offset spatula to help smooth it out, making sure to get to all the corners. Try to get this as smooth as you can. Bake at 300 degrees for 25 to 30 minutes.

You can click here to download a PDF of my Gingerbread House Pattern. I’ve used this pattern to make my house every year for as long as I can remember. Print it on heavy cardstock, or trace the pattern onto a manilla file folder, or the back of a cereal box. Trust me, the thicker your pattern pieces are the less burned your fingers will be. When your gingerbread is done baking, layout the pattern pieces on top and cut immediately. A tip from the experienced: Curl your fingers under a bit and hold the pattern pieces with your fingernails, not your fingertips. This will result in fingers that are much less burnt. Trust me.

Your gingerbread will start to get stiff and hard as it cools off, so it’s important to cut your pieces out as soon as you can. And the other important part is to eat the scraps before they cool off. When they are warm they are super soft and delicious. But as they cool off they lose that softness. Good for building houses, bad for snacking.

Here is a layout for how your house pieces will fit on the cookie sheet. While your gingerbread is cooling off, make your frosting.
Royal Icing Recipe
3 egg whites
1/4 tea cream of tarter (helps it dry hard and a little shiny, don’t leave it out.)
2 LB powdered sugar.
Beat together until the frosting is stiff. You don’t want it too runny because it will take longer to dry. But make it too stiff and your hand will be on fire by the time you are done squeezing all that frosting onto your house. You can spoon your frosting into a pastry bag with a tip, or into a ziplock bag. Cut off a teensy bit of one corner of the ziplock to squeeze the frosting through. Keep extra icing covered in the bowl, covered with a damp towel so it doesn’t get dry.
This is where there should be a picture of decorating my house. But, my hands were covered with frosting and sugar and candy, and I thought it wise to not pick up my camera. I always decorate my house pieces before putting it together, it’s a lot easier (in my opinion).

I covered a pizza pan with tinfoil to use the base for my house. But you could use a piece of plywood, heavy cardboard, or a 10″ cardboard cake round. Use lots of frosting to stick your pieces together. I usually start with the back of the house, and then add the sides. Then I’ll add the front piece.

Before you attach your roof pieces, fill in any gaps with frosting, and reinforce seams with frosting or more candy. Candy sticks or candy canes work particularly well on those corners.

I always leave the door to my gingerbread house open a little. Why? No idea, it just makes it seem more inviting. This year my door is “glass”. It’s covered with coarse sanding sugar so it’s sparkly. I made my windows the same way.

Then you are ready to put your roof pieces on top. Use a thick line of frosting along each slope. When both pieces are in place, run another thick line along the top seam, and fill it in with candy. A candycane/candystick works particularly well here, but you could also use licorice, or a line of big pieces of candy, like these gumballs. This will help keep the two pieces from sliding off before the frosting gets hard and dry. Then I covered up the edges of the roof with more frosting. I’m all about having the thing completely covered.

Full Disclosure: I thought I might run out of frosting before I finished the whole thing, so I left one side of my roof undecorated. It was a wise move… I used the last little bits to finish the edges of my roof. I only used 2 egg whites instead of three when I made the frosting. Which was dumb. If you aren’t going to cover every single little bit of gingerbread with candy then you would be fine with 2 whites for one house. My original plan was for a gingerbread and red and white and green house. But then I remembered the pink candysticks after I made the frosting and plans changed.

Except for the pink candy sticks, which I bought at a candy factory a few weeks ago, all the candy on this house came from the grocery store bulk bins or from walmart. The shutters are laffy tafffy. Those are pink bubble gum balls along the peak of the roof, and pink M&M’s for shingles. I used pink heart shaped marshmallows, pink sweettarts, and pink sprinkles on the backside of my house. And the pink “bricks” on the front were some awful tasting jelly something. I had to cut these in half, so technically I’ve got a pink split face brick going on.
I was running out of naptime (not to mention frosting) so I didn’t finish the yard. I’ve got some gumdrop and sucker trees that will make an appearance, as well as a white chocolate pretzel fence, and a pink starburst front walk, nestled into a bed of crushed peppermints. Tomorrow, I’ll think about that tomorrow.
I make a completely different house every year. Last year was a rock candy and black licorice tudor style house, with hershey bars for shutters and Cinnamon Toast crunch for shingles. I’ve made plenty of houses in Christmas colors, and some in all pastel candy, but this little pink house is my favorite. So far. I’m sure that will change next year. I’ve got one more project left in my Handmade Christmas series which I’ll post tomorrow. See you soon!


