Fabric Bunting Tutorial
I started this project 3 weeks ago, but it shouldn’t have taken more than one evening to make. But I had a minor binding crisis and after eating a lot of cupcakes I unpicked a whole bunch of stitches. And started over. And I like round 2 a million times better. And I still have another stack of scraps to make a few more of these pretty fabric buntings. Pretty sure that these are the most versatile thing I’ve ever made. And here is the how to.

You can download my Bunting Template and print it at home or you can make your own template with a paper plate or mixing bowl or whatever else you have hanging around. My favorite mixing bowl (and therefor the template)is 8.5 inches across, but I also included a mini version at 5.25 inches across. Trace your template onto cardstock or thin cardboard like the back of a cereal box. I choose the rounded shape over a triangular pennant shape because I think you can see more of the fabric that way.
Pick out some great fabric. All of mine are either one color with white, or a tone on tone print, because that is mostly what I am drawn to. If you are going to use my large template you’ll need a piece of fabric 7.5″ x 17″. (The mini size uses a piece 4.5″ x 11″.) Each flag is about 8 inches across finished, so figure out how long you want your bunting to be and use however many flags you’ll need to achieve that length. For my 6 foot window (where this is going to end up hanging) I used a 7 and a 9 flag bunting together. OK, let’s get started.

Fold your fabric right sides together and trace your template with a pencil (I used a pen so you can see it). Then pin the pieces together with the pins well inside your traced line.
I pin them this way because it holds the pieces of fabric together while I cut, and then it is all ready to sew together without having to repin everything. And I am not talented enough to sew around curves without pins. When you are all pinned, cut out your pieces.

Now sew around those curves (leave the top straight side open) with a 1/4″ to 3/8″ seam allowance. I just lined them up on the edge of my presser foot, because that is the easiest way for me to keep a uniform seam. Pull the pins with your left hand (which might feel really backwards) as you sew. Or if you pin them far enough on the inside of your shape you can just sew the seam and then pull them out when you are done.
After your flags are sewn together, clip the seams every 1/2-3/4″ around the curves so it will lay flat when you turn it inside out. Don’t snip your stitches. If you do, go back and resew that part.

Turn your flags right sides out, push out the curves and press around the edges so they lay flat. I found it was faster to do these assembly line style, so do all the sewing, then the clipping, then the pressing.

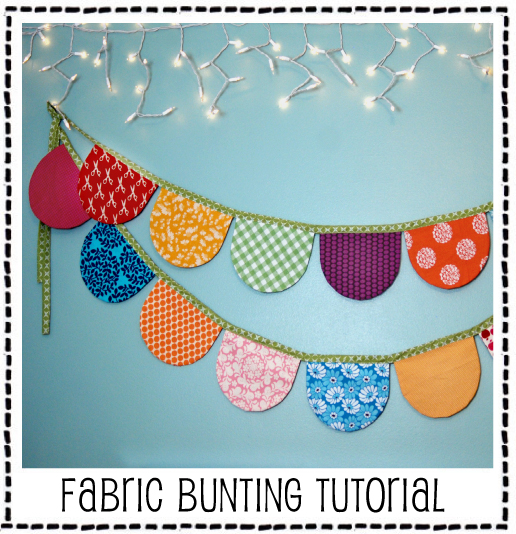
Lay out your flags on the floor to get them in the order you prefer. Now that I am all done I wish I’d switched the top left light pink with the bottom right dark pink. (Why do I always see this in pictures after the fact?) Oh well. I choose to do two separate buntings, but I wanted to hang them up together, so I arranged my colors so they’d look good by themselves or hanging up together. If you make one long bunting (like this pink one, or this red white and blue one) you can still get a dual look by doubling the bunting back on itself when you hang it.

Next choose a bias binding. You can use a prepurchased double fold binding, or make your own. (You’ll want a bias binding so that it will hang with a smooth curve.) My first round I choose the wrong thing for my binding. After I was finished sewing the whole thing together I realized it was too bright, and had too much white on it. So I unstitched it and found a new fabric which is a little more neutral. (This green is a Heather Bailey print from the Nicey Jane collection.) I cut 3″ strips on the bias, folded it in half and pressed it and then folded the sides to the center and pressed it again, making my binding about 3/4″ finished. Next time I’ll make it smaller at 1/2″ finished, I think. I used 11 feet of binding on the 7 flag bunting and a little over 12 feet on the 9 flag bunting.

Start sewing your flags on! I sewed my binding together for the first 30ish inches so I had a long tail to tie my bunting to curtain rods or nails in the wall or whatever. This will also give you a little wiggle room when you hang it up so you can adjust the length easily to fit your space. Then just tuck in your flags, making sure that the raw edge is all the way to the middle fold of your binding. Sew along the edge, carefully, so you catch the top and bottom edges of your binding, and leave about a half inch of space between each flag. When you are finished with the flags sew another 30ish inch long tail so you can hang your bunting up easily.

Tada! Finished fabric bunting that you can reuse for years. I hung it up on the wall in my craft room for a picture, because taking pictures of something hanging above a window is hard. And I can never get the settings on my camera right, so it ends up totally dark or way too bright. So wall photo it is. I just used two long sewing pins stuck in the wall to hold it up. But I think I’ll hang a curtain rod over my window so I can just make loops in the ties and hang them up that way. And now that I’m looking at pictures, I really think I might switch those dark and light pinks on the edges. Which means just a little more unpicking.
Trackbacks
- Party Details Link Love « Humpty Was Pushed
- Project 52 | 24 | SipNSavor.com
- Baby Shower Ideas and Photos for a Sweet Baby Girl | Laura Catherine
- DIY: Haz tus propios banderines | Blog de Boda 2.0
- Bienvenue chez Mininours « Made By Ally
- Avec du tissu, je fais… | Vie de tissus
- A lavender baby shower | suddenly inspired



So cute! I hink he green is a perfect match for he binding. I liked the zig zag too, but I do think this is better.
I think it is darling.
Love it. So cheerful. I need some cheerful today. Thanks for such a great tutorial. 🙂 We are finally back and a little settled from all our busyness this summer. Are you slowing down yet? Want to get together for some happy fabric viewing?
Let me know!
-L
Beautiful tutorial. Thankyou , I know how long these things take. You are a good egg !
We live on Vancouver Island in B.C., Canada and just yesterday got home from a trip to New Mexico. At an Albuquerque farmers market I purchased something similar to this bunting. They looked fabulous hung on poles around the crafter’s stand. She had used vintage fabric and wow, so cute! I bought one but knew I wanted to try and make others so thanks so much for the directions! She had two sizes, and her pieces were half a circle which I think I will do (rather than an elongated half circle-has a softer look). Oh ya, I also picked up some vintage hangies while away – she had quartered the hankies and used the same way. This will be a bit tricky on the cutting part of it.
Thanks again,
Sandie
it likes easy, but operating cumbersome.
Used your bunting template and tutorial, come check it out.
Thank you for the tutorial, such a sweet bunting!
This is a great tutorial! I made them and they turned out fantastic!