Scrap Flower Tutorial
Next up for Pink Week is the tutorial for the sweet little fabric flower brooch that is part of my giveaway. I used the scraps from this skirt to make those little flowers and it couldn’t have been any easier. These scraps are from the quilt I finished at the beginning of May. The best thing about these little flowers is that they are incredibly versatile. You can glue them to a headband, or an alligator clip and use as a hair accessory. You can string them together for a fabric statement necklace, you can attach a pin to the back and use them to decorate your jacket, or your purse. There is no end to the possibilities! Without anymore blabbing from me, I’ll give you the…

Materials needed:
- Scraps of fabric- these can be any pattern, or a solid, any width from 1 1/2 inches down to as skinny as 1/2″ They don’t need to be cut straight, threads hanging off the side only add character, you can use a selvedge edge, and the length doesnt’ really matter. A true scrap busting project!
- A small scrap of felt in any color- this one is about 4″x6″ and I used a little more than half. You aren’t going to see this from the front, so any color you have will be fine.
- A few inches of ribbon, tulle, fabric, ricrac or whatever other scraps you see laying around for a leaf.
- Small scissors
- Hot glue gun and glue
- Pinbacks, alligator clips, headband, whatever attachment you want. You could even use a safety pin.
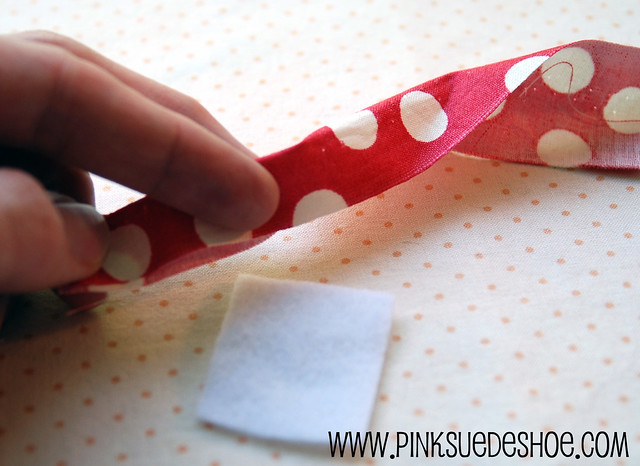
To start cut a small square of felt, this is about .5″ square. If you are using a patterned fabric, fold it in half wrong sides together. (Or you can leave it unfolded- your flower will be brighter if you don’t show much of the wrong side of the fabric.)

Start twisting your fabric around itself until it’s a good little twisted rope. Put a dab of hot glue in the center of your felt. Tuck the raw end under and start coiling your rope into a circle. Keep going, adding more hot glue along the edges until your flower is the desired size (or until you run out of fabric or felt) Tuck the tail end onto the back and secure with hot glue.

Another option is to start with a skinny-minny scrap and add a wider scrap for the outer few layers. To do this, cut your large scrap into a point, and tuck it into the end of the skinny-minny before you glue it all the way down. This will give your flower a little different dimension.

When your flower is all glued down trim off your excess felt. (This particular scrap was about 30 inches long, and so after I trimmed the felt I cut the tail off and glued it down on the back side.)

After you have a few flowers made (stick to odd numbers, it’ll look better) cut out two leaf shapes, one larger than the other, from a scrap of fabric, or tulle. You could also use a little scrap of ricrac, a small feather, or some ribbon. Whatever you’ve got in your scrap box. I made the base of the leaves wide so that I could gather them a little. Then glue them onto the back of one of your flowers.

Arrange your flowers however you’d like and then using a lot of hot glue, glue them to another piece of felt, and trim the excess off the edges.

After it’s all done I saw this little polka dot ribbon and I decided that I might like that better. So I just trimmed off the striped leaves and glued the ribbon bits on. At this point you could embellish it with little buttons, beads, rhinestones or anything else that you’ve got lying around. Glue a pinback, or a clip to the backside and wear your scraps in style!

Here is the brooch I made for the giveaway, with a little tulle for the leaves. Both brooches measure about 2.75×3 inches. The size of each individual flower will depend on the width and length of your scraps, as well as how tight you twist them up. And, since it’s just scraps, make a bunch and play around with it. It’s basically a free accessory for you or a pretty gift for someone else!
I’m adding this to Sew&Tell at Amylouwho’s. It’s a great way to start the weekend!
*** This pattern is for personal use only. You are welcome to use this tutorial to make pins for yourself or to give as gifts, but please do not sell accessories made from this tutorial. If you post pictures of something you made using this tutorial, please link back to this site I’d love to see your pictures. But please don’t post any part of this tutorial on your blog. Thank you. ***
Trackbacks
- Thursday thoughts « Overlapped’s Weblog
- Friday Footsteps « Women of Promise
- Midnight Sparkles Clutch « Sew Chic and Unique
- Inspirations « Emily Rose
- Something Fun: Fabric Flowers – Crafty Girls Workshop
- A bouquet of flower projects you can make - tutorials, DIY & Inspiration - The Hive - an arts and crafts communityThe Hive - an arts and crafts community
- PinkSuedeShoe ::Scrap Flowers:: « Live Intrepidly
- 25 Scrap Fabric Projects - The Princess & Her Cowboys
- 11 Pre-Holiday Items You NEED to Thrift for Right Now - Moxie Girl


Great tutorial! Thanks for sharing. Happy Sewing! :o)
It’s like an instant corsage! thxs! how beautiful!
That is too cool! Great use for those little string scraps!
I’ve been waiting for this tutorial. You make it look so easy, I shall have to give these a try! Thanks for all your lovely pink inspiration this week. Great eye candy!!
It’s like an instant corsage! I love the flowers. So many ideas on what to attach them too. Thanks for the tutorial :oD
very, very cute! thanks for the tut!
Hey, can I get a copy of that picture of Eric tossing Iris up in the pool? So cute! And Eric said you took a cute one of her at the Memorial Day picnic. If you still have it, can I get that one, too? Thanks!
I have admired your flowers on your blog. Thanks for providing the tutorial! So pretty!
Such a pretty flower pin!
Cute cute cute! Thanks for the tutorial!!
Thank you! Thank you! 🙂
This is really really cute! I can’t wait to dig through my scraps and see what I can come up with. Loving your blog btw!
Merci beaucoup !!!
J’ai adoré faire mes petites roses ✿°•
I always thought they were ridiculously hard but you make them look so easy and cute! Of course I’m sure I will end up with hot glue everywhere and a disastrous flower but I am so excited to try them! Thanks!
Hi! I just posted my first attempt and cannot thank you enough for this amazing tutorial! They are so much fun to make and I love their look – I can’t wait to make more!
Thank you so much – see my post here:
http://www.60bphotography.com/2010/07/pinksuedeshoe-scrap-flowers.html
I hope you keep posting tutorials – your descriptions made it so easy!
My daughter and I sat and made your scrap flowers today. We parked ourselves around my kitchen table with everything we could find that would look really awesome on our flowers and watched the men from the security system place install a fantastic security system in my home while we made three of your flowers. We love them and are very proud that we made them (only because of your great idea and very informative tutorial). Thank you for sharing your great idea. The security guys even liked them!
I missed this earlier – but I need to make some of these. SO cute.
I hope you don’t mind, I linked to this tutorial over on my 12 Days of Craftyness post on my blog. Thanks for such a great tutorial!
I love the peppermint looking flower.. I can see a Christmas ornament being made this way! thank you for the tut,Amy
rajarj
Hey I love this turtorial and cant wait to try it myself! I hope its ok I linked to your page on my post on recent inspirations over at http://emilyrose1984.wordpress.com
This is the cutest idea. I’ve been wanting to make my own flower pins and hair accessories. Your technique is so simple. I love it!
Thanks, this is the easiest rolled flower tutorial I have found
Genious! Love it! Can’t wait to try it! 🙂
This is perfect for a headband to match my grand daughters new dress thank you!
this seems so easy, thank you so much for sharing!
Reblogged this on Jing, Beyond bondaries and commented:
Maybe this one too when I get a chance? 🙂
Hi – I love this and it would be perfect for my daughter and her friends to make – they’re making hair accessories for this year’s craft fair (they do the craft fair at school every year to make money for charity) – I know you asked not to make these for sale, I am asking for your permission to let the girls make them for their charity sale … if you say ‘no’ we’ll totally respect that. Thanks for your wonderful blog! 🙂
Why you prefer something startup new? Open and look at this page. Only there the choice of girls for every taste and completely free! They are hardcore slaves, they will and want perform everything you command !
https://rebrand.ly/governy#J53
I love your flower and you made it look easy I want to make some for sure now!!!
I am into making flowers and I will add this to my to do list! Thank you