Toy Sack Tutorial
I mentioned a few days ago that I had been doing a lot of secret sewing. And this is part of it, 1/eleventh of it to be specific. That’s right, I was commissioned to make ELEVEN toy sacks as Easter gifts. It was three spools of thread and 33 yards of heavy 60 inch wide canvas and denim. Plus a full week of work. And while I was sewing I learned a few things, so I thought I’d share.

Now, before I get a million comments and accusations telling me I ripped of Toni Coward’s Lego Sack let me just state my business here. I actually made twelve bags. And the first one I followed her great tutorial. But because of the heavy canvas on one side and the denim on the other the drawstring was rendered utterly useless. By the time I got it cinched the opening at the top of the sack was 16″ across. Which is less than awesome for holding stuff inside. So I scrapped that first bag and did some thinking and then made eleven using this tab top method. (Tabs are WAY more economical than using grommets. For my eleven sacks I would have needed almost 300 of them plus I would have had to set them all!) If you want to use light weight cotton, you can use Toni’s drawstring method with no problem, but if you want to use denim and canvas for a sturdy bag? Well, then try this.

For my sacks I used 60″ wide dark denim on one side and a fun printed canvas/heavy upholstery/outdoor fabric on the other. These kinds of fabric are usually between 54 and 60 inches wide, which will give you a nice big sack without having to piece the fabric together. I bought all my fabrics at The Home Fabric Store because they have rolls and rolls of heavy, wide fabrics for super cheap. The denim was only $3 a yard and most of the others were between $4 and $6 per yard. (As opposed to most other places, Joann, Hancocks, etc where it’s between $15 and $25 a yard.)
For each sack you’ll need the following supplies:
- 1.5 yards of 54-60″ wide denim or canvas for each side. The stripe is actually a thrifted canvas like shower curtain.
- 5 yards of 1/4″ or 5/16″ twisted nylon rope. I bought this spool of 100 feet at Walmart for $11, they have smaller packages or you can find it at any home improvement store. ( The nylon twisted rope is much slipperier and smoother than the braided variety.)
- measuring tape, scissors, marker, general sewing supplies

Start by washing and drying both pieces of fabric. Since this is going to be something you might want to wash at some point, try and get all the shrinking/warping out before you sew your project. Then you need to cut them both into a large circle. In this one I only used a 10″ radius (which will give you a circle 20″ across) so it would fit in a picture. But when you are making your sack you’ll want at least a 24″ radius. More on that later. To make a perfect circle fold your fabric into fourths and use a measuring tape to make a mark along one edge your desired radius from the center. You could use a fabric pen, but I just used a Sharpie marker. Continue around your fabric, making sure to keep the zero end right at the point of your fabric. After you have a little mark every few inches connect the dots to make your cutting line, then cut it out. Unfold your fabric and ta-da! Perfect circle. Use this as a pattern and trace it onto your second fabric and cut out.
I don’t have pics of this next step, but you’ll want to make evenly spaced marks around the outside edge of your circle to attach your tabs. Fold it in quarters, and then quarters or thirds again to evenly space your marks. You’ll want at least 5 or 6 in each quarter of your circle. For this 24″ circle my marks were about 7 inches apart. (If you have questions on this ask them in the comments.)

Now lets make some tabs, without having to turn a bunch of long skinny strips inside out. Use the corners you have leftover after cutting your circles out and cut 2.5″ strips. This sack has a 24″ radius and I needed 24 tabs. I made a few other sacks that were a little larger, with a 28″ radius and I needed about 32-36 tabs. After you have cut your 2.5 inch strips iron one side down about 1/4″. Then fold the opposite side up about 3/4″ and press again. Fold the 1/4″ fold side down over the 3/4″ side so that all the raw edges are in the middle and press again. Then stitch down the center of your tab. For this part I moved my needle over to the very far left side of my machine because my presser foot has a handy guide to help me sew right on the edge over there. Then cut your strips into 4″ lengths.

After your tabs are all made, pin them to your marks on your circle. Fold each in half but with offset ends and center on each mark and pin. The offset ends will mean you aren’t sewing through as many layers of fabric at a time. Make sure you are pinning them on the RIGHT side of your fabric, with the raw edges lined up and the folded end of the tab pointing towards the center. Continue pinning all your tabs in place and then sew around the entire perimeter of your circle about 1/4″ from the edge. (True, you don’t need to sew between each tab, but sewing in one big long stretch is a lot faster and more thread efficient than just sewing each tab and cutting your thread and moving to the next one.)

Next pin together the right sides of each circle, so the tabs are sandwiched between them. And don’t freak out if it seems your two circles are not the same size and you have a gap of fabric left over when you are done pinning. Just keep going around your circle again, stretching the “small” side a little as you repin it until you’ve used up all that gapiness. Only 1 of my 12 bags lined up close enough to skip this step. After you’ve pinned your two circles together sew them together about 5/8″ from the edge. You want to make sure you are inside your first line of stitching. Leave at least a 10″ opening to turn it inside out. A little too big is way better than a little too small. Before you turn it inside out clip the curves all the way around, about an inch to an inch and a half apart. When you get to a tab clip on each side of it, don’t try to clip through all that fabric at once. Clip your 10″ opening as well.

Turn your sack right sides out and use those tabs to help you pull out all those edges. Now you need to use a good hot iron and press that outer seam as flat as you can get it. Carefully turn the opening under, press and then pin it closed.

Sew around the edge of your circle again, this time only about 1/8″ from the edge to finish things off and close up that opening. You might need to sew slower as you go over the tabs. There is a lot of layers of fabric in there. For this project I didn’t use a denim needle, just a new sharp universal needle and didn’t have any problems. If your standard needle is having trouble sewing through all those layers switch to a denim needle and go slower. Finally, string your rope through the tabs and tie a knot in each end to keep it from pulling out easily. It will still fit through the tabs, but it will take some working. The ends of nylon rope frays easily, so you are going to want to either burn the ends, or wrap them tightly with clear tape. I voted the tape route because I hate the smell of match smoke. Also note: If you used a radius over 26″ you might need a little bit more than 5 yards of rope.

Because of the rope and tab closure this sack/play mat is completely reversible. So Creamie has been using the striped side as a rainy day indoor picnic spot for all her best friends.

And the other side is for her trains. She got some new tracks for Easter (this is an Ikea wooden train set) and she is all ready to lay down more tracks and go on more adventures.

And when you are done playing just cinch up the rope and tie it in a slipknot to hang over the doorknob, from a hook, or just leave it in the corner. The mess is happily contained until it’s time to play again.
*Once again, this tutorial was inspired by the Lego Sack by Toni Coward, but was written specifically for heavier fabrics like denim, canvas, heavy upholstery and outdoor fabrics.
Pink + Orange + Turquoise
A few weeks ago Scott went on a business trip to the Phillippines. (And while he was gone my toothbrush was seriously lonely.) And in the nine days that he was gone he was on seven different planes, four different islands, and five hotels. Which means he took the smallest bag he could possibly take. And he also didn’t have much room to bring home goodies. But he did find two spools of pretty crochet thread.
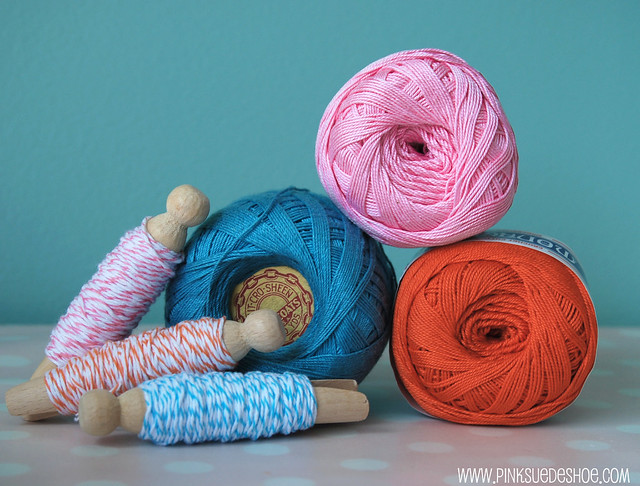
And they have been sitting on my desk for a while, and today I realized that the pink and the orange and the turquoise of my walls were pretty perfect together. So I pulled out the turquoise spool from my pile of thrifted threads and a few pins of bakers twine and it might be my new summer color scheme. You know, for all that scheming I do.
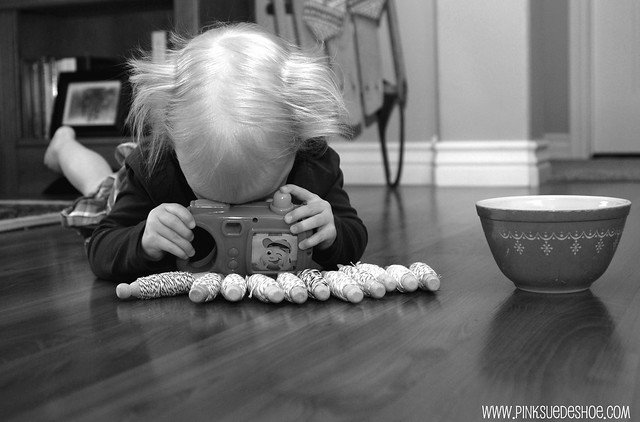
I also wanted to share this picture from a few weeks ago. After I took the pictures of my twine for this post Creamie asked me if she could play with it. And this is what she did. Laid it all out just like me and then went running to grab her little camera. The best part was her telling the twine that it was time to smile for a picture. I love this girl.
The Easter Dress
I finished Creamie’s Easter dress yesterday. I could go on and on about how much I fell in love with the polka dots, or how awesome having a Kona color card was so I could find the exact yellow for the sash on Amazon, or how I had to sew the zipper in by hand because of… well, I don’t remember exactly, or how irritated I am that even though I remade the top twice, taking inches out, it still looks about two years too big for her, but instead of all that, I’ll just show you the dress. We went to Salt Lake City yesterday for a fantastic Easter party at my sisters house and on the way home we stopped to take pictures at Temple Square. And for the first year maybe ever the grass is green for Easter. Most every other year the grass in the pictures is a pathetic anemic brown. Yay for late Easter’s and professional gardeners!


I can’t tell you how many times she made this face. To be fair, it was only like 53 degrees outside.

But after we pulled out the bubbles she perked right up. That girl loves her some bubbles.


And even though it was a breezy 53 degrees with the sun starting to set, it was all I could do to keep her out of the water. And I am using the term “out” loosely. If her fingers look red and freezing it’s because they were.

She tried to climb into every single fountain. And she would have been successful if that sash wasn’t long enough to catch her at the last minute. Finally she offered to take her dress off so she could play in the water. Funny girl.


I hope you are having a wonderful Easter weekend. We had a big party yesterday, and another today and then another this evening. And all three will involve large quantities of delicious things to eat. Happy Easter!
It’s Spring…
You know it’s spring and Easter time when you can find bags of just black jelly beans at the grocery store.

It’s probably my favorite thing ever. I’ll be back tomorrow with some pics of Creamie’s finished Easter dress. And then this coming week I have two tutorials planned, plus a little celebration of my favorite made up holiday. Thursday is my 5 year sewiversary. It’s a holiday I made up to mark the day my sweet husband and mother in law gave me my sewing machine. If I can get myself put together before then I might have a prize! (I should stress the “If” in that last statement…)
100 Dresses
Growing up one of my very favorite books was The Hundred Dresses by Eleanor Estes. I read it over and over, and still read it every once in a while. When I was about 12 my dad gave me a fashion designer drawing kit. It had templates to use, and ideas to trace, and stickers to put on your finished creations. The ideas are all fabulously mid ninties. And I am sure I still have the complete sheet of stickers, I never used even one of them. Over the years I have drawn hundreds and hundreds of dresses. In highschool I did a history of fashion project and drew period clothing from every era of America’s history. Which, you know, compared to other countries isn’t too long, but it was about 25 colored drawings. I still have them in a file folder somewhere.

I carry a notebook with me wherever I go and I am constantly sketching other people’s clothing or purses. One of my favorite few pages of sketches is from a week I spent in Prague by myself almost 8 years ago. I love those drawings. I sketch people at church too… it’s one of my very favorite places to check out dresses and shoes and coats! There are so many people from such varied backgrounds and ages each with a different style that I always come home with 10 or 12 new sketches and ideas. (I’m a good multi tasker so I can draw and listen at the same time. Or something.) I also keep a notebook next to the couch so I can sketch dress ideas that I see in commercials, or TV shows, or movies. I started watching Mad Men this year and though I hate the story and despise the characters, I am in love with the costumes. The combo of the big 50s skirts and the sleek 60’s styles are my very favorite. Sigh. So pretty. And then every couple of weeks when I have a few hours to myself I’ll go through my sketches and clean them up and a new idea to the “clean sheets.” Which are… well, just like they sound (on the right above). And I have stacks of them. A few have made it into my art journal too (above left). But most of them are tucked away waiting for me find the time to take pattern drafting classes at my local state college and learn how to sew for reals. Instead of my standard fly by the seat of my pants, or skirt. Anyway that very long backstory is leading up to this. For my birthday in February Scott gave me a new book.

It’s another 100 Dresses. And it is fantastic. I have loved flipping through it and soaking up all the beautiful pictures inside. All the dresses inside are from the Costume Institute at the Metropolitan Museum of Art. And they are amazing. Each dress has a short paragraph with information about the designer and the era, but the photos are the main stars. Here are a few of my very favorites. The black long sleeved number in the middle was Yves Saint Laurent’s very first design after he was hired by Christian Dior just a few months out of design school. These dresses make me wish I had more black tie balls to attend. Or more time to sketch, which is probably a little more realistic.

The only thing I didn’t particularly like about this book is that from the last 27 dresses are all from 1980 until now. And most of them are pretty “out there” space cadet super weird dresses. Actually of the 27 only 4 or 5 of them had ANY redeeming characteristics. And only one made it to the top 10 (the pink one on the cover, designed by Vivienne Westwood in 2005). I’m not sure what that says about current fashion/the curator of the book/my definite penchant for vintage style. But I kind of wished that there had been fewer of those crazy 80s and 90s dresses and more 1940s ball gowns and more Mad Men. But that’s just me.
Designer Credits from the book. Top row: left: Jacques Fath, 1947, center: Yves Saint Laurent for Dior, 1958, right: Christian Dior, 1953. Middle row left: Madeleine Vionnet, French, 1938, center: Christian Dior with Yves Saint Laurent, 1955, right: probably European, 1798. Bottom row left: Liberty of London (founded in 1875), early 1880s,center: Andre Coirreges 1965, right: Cristobal Balenciaga, early 1960s.
A New Friend
It’s been a while… I know. Thankfully my absence hasn’t been due to another bout of sickies. We are all healthy. Yay! Creamie is sleeping through the whole night in her own bed. Yay! I have been sewing everyday. Yay! But most of my projects are surprises for real people in my life who sometimes read my blog… so I’ve been busy everyday, but I can’t post about any of it. Bummer. But this guy was delivered yesterday, so it’s his turn to make an appearance. Say hello to L.T.

What, you’ve seen him before? Yes. You have. Well, not this LT, but another LT elephant. I made two little softies at Christmas for my neices. And this is one more. All three (and one for Creamie that is still in pieces… I hope to finish it for her Easter basket!) They are all made from Scott’s dad’s favorite special occasion suit. And the shirt and tie he always wore with it. This one was for Scott’s sister Stephanie’s birthday. And he turned out just as cute as the others. Well, at least I think so.

The little elephant pattern is from Jodie Carleton at Vintage Ricrac. Yo u can buy her patterns here. This is the third time I’ve made this elephant, I think he is just so cute. Making the tie for this little guy was the hardest part. (Not in the pattern, I just made it up.) But, magically, I squeezed four tiny ties out of one. It’s a little skinny, but I didn’t have any other options. There just wasn’t any more fabric. The buttons on his joints are all cut from the suit, and the whites of his eyes are from the shirt.

If it stops raining today and the sun comes out a bit I’ll be able to take a few more pictures to post tomorrow. I have new Pyrex, and new fabric, and a few birthday presents that I’ve had for like 2 and a half months and still haven’t been able to play with! But things are finally settling back down into our normal routine. I hope we are never sick again…. you know, until next winter.
Finishing Up
Today’s goal is to finish the quilting on this quilt today. (If you weren’t around last fall, when I finished the top, this quilt is made from Scott’s dad’s clothes. He passed away last Spring. I made two more memory quilts at Christmas time for his brother and sister.)

I’ve had the fabrics since last May. I started sewing in September, finished in October and it’s been sitting there ever since. I’m piecing the back together right now and then I’ll spend the rest of my day wrangling this giant quilt. I can’t wait! Oh, and wish me luck!
Happiness Is…
It’s been nine days and more than seventeen thousand traveled miles.

I’m glad he’s on his way home.
Better than Easter Eggs!
So I freely admit that I have an addiction. If I see something I like I have to have it in every single possible color. I’ve had it as long as I remember. My favorite present when I was little was the big box of 4 million different colored crayons. And spring weather brings this addiction right to the surface. Last year instead of Easter eggs in my basket I had washi tape. Lots of it. And this year I have this.
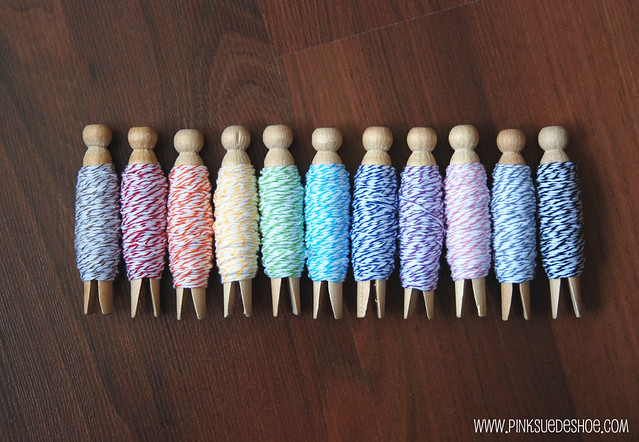
Divine Twine in every color. Eeep! One of my favorite etsy shops, sugarbsupplies, recently listed sample packs of twine, I know, awesome right? Ten yards of awesome in every color. I could hardly order it fast enough. And it arrived this week, and it is just so pretty. Last year sometime I picked up a bunch of vintage wooden clothespins at the thrift store and last night I spent a few minutes wrapping all my twine around those cute pins.

And I am pretty sure that a Pyrex bowl of colored twine is quite possibly the best Easter basket I’ve ever had. Well, you know, except for last years. Next year maybe I’ll splurge and buy a whole spool of each color! Sigh, I’ll stick with my little clothespins for now.

They are so pretty. It kind of reminds me of candy in a bowl, or ice cream. And I should be eating it with a spoon. Or something.
My New Baby
I’m not pregnant. But we do have a new baby at our house. He has a few older siblings and one kid brother, Tomy. I should probably blame him for taking up my time and keeping me from blogging, but that isn’t really the problem. I’m just… busy?

Several weeks ago I wrote about finding Creamie a small vintage typewriter for her birthday, and in that post I linked to two others I was still hoping to find. And a very sweet reader M told me she had one. This one. A red Sears Holiday, made in England in the 1950s. Amazing.

It had been her older sisters and was handed down to her. She told me it was headed for the yard sale, but if I wanted to buy it she’d give me first dibs. It arrived a short time later in it’s original red carrying case with red houndstooth lining. (Have I mentioned I love houndstooth? LOVE it.) And it has been sitting on the dresser in my bedroom ever since. It’s beautiful.

We shared a hot fudge sundae/banana split/way too much dessert this afternoon. You know, me and the typewriter. And M, if you didn’t live on the other side of the country, I’d invite you over for a great dinner and some chat time and send you home with homemade hot fudge sauce for your family. Thank you a million times over for sharing your treasure with me. You will now be a part of my life forever, and if Creamie shares my love of typewriters, which I hope she does, you could be in our family for generations. I think I’ll have to make a little treasure book full of the stories of how my favorite things came to me. I’m glad you’ll be a part of it.


