I want that.
Do you want to see what popped up in my google reader today? It totally caught me off guard, and I’ll tell you why. But first look. Just Look!

Awesome vintagey/antique looking crate, right? Right. Well, it’s cooler than that. If you read this whole post by Jessica at Running with Scissors you will discover three things that make this way cooler than it would first appear. Well, four.
- Number 1– That lantern that is sitting on the little stack of books? It’s a $2.00 thrift store makeover. Amazing, yes.
- Nubmer 2– She made this magazine crate from the scraps she found in the backyard of her new house and a few nails.
- Number 3– She freehandead all the letters and painted them with a brush. No stencil, just her and her talent and her paint.
- Number 4– Pierre Crapeau is one of her husbands ancestors, born in Bordeaux about the year 1670. He stowed away on a ship to come to America.
So, number four is the reason that my eyes popped out of my head and I said to myself, in my outloud voice, “Shut. Up. Where. Did. She. Find. That!” Pierre Crapeau, from Bordeaux who was a stowaway on a ship is my ancestor too. (We’ve already figured out that her husband and I are distantly related, and that she was friends with my younger sister in highschool and has been to my house and stuff.) But still, to see one of your ancestors names painted on a crate that looks like it came from Pottery Barn while casually scrolling through your reader will catch you a bit off guard. And then you read the post and find out about numbers 2 and 3. Jessica, you are amazing. And I am totally going to make one of these for a newspaper recycling box.
The Weekend
This weekend I spent at a family reunion. I didn’t take nearly enough pictures, but I sure had a great time catching up with some of my aunts and great aunts, cousins and second cousins, and first cousins once removed (or whatever the official term is). We talked families and mommyhood and babies. We painted toenails and talked craftiness and art journal-iness. And all in all it was two days full of a generally wonderful time.

Creamie ate lots of snowcones. Lots of them. Hence the red stripe down the center of her chin. And after some serious snowcone stain removal on my part this shirt is finally clean. It was a great idea, but next year let’s have white snowcones. Deal?
 It was too hot to do much playing outside. (Ok, I’ll be honest. It was too hot for ME to want to play outside. Every year a little part of me dies when it gets much over 65 degrees. I am such a winter girl. I can’t wait for the heat of the summer to end and for nice normal 32 degree temperatures to come back. Winter I miss you.) Anyway, she had a good time running all over this big empty room with her cousins/second cousins. And when it was time to clean up and go home she dragged a broom across that floor for 30 minutes with me, crying whenever she thought someone might take it out of her hands. She is very serious about her sweeping.

Do you want to know what that is? A 25 foot tall movie screen… I know. One of my cousin’s brought this and set it up for a “little” evening double feature. When you are showing a movie to the masses (and we can easily refer to my family as “the masses”) you’ve got to go BIG. We couldn’t stay for the show, unfortunately. Creamie was getting to the brink of meltdown due to sleep deprivation so we headed home. But next year, let’s do that again, OK?

If we had stayed I am pretty sure that this would have been the look on her face through the whole event. Until she passed out from exhaustion. It was so fun to see so many of my cousins and their kids. Hopefully next year Creamie will do a little better at going to bed late and skipping naps so we can stay and play a little longer.
Of course, me going home early wasn’t all bad. While she slept at home I made her a new dress to wear to church today. I’ll post pictures tomorrow! All in all it was a good weekend. What did you do?
Farmer’s Market
I stopped by one of my local farmer’s markets a few days ago in hopes of buying some really great lettuce, and fresh green peas and spinach and zucchini. Creamie and I came prepared with stroller and water and reusable shopping bags and sunscreen and snacks and everything. I was really hoping to find something kind of like this.
 [ image source ]
But I was disappointed. This particular Farmers Market was mostly markety stuff (hair accessories, baby paraphernalia, jewelry and scented candles) and not much farmer. Which is fine if you are looking for hair accessories or baby paraphernalia or jewelry or scented candles. But it’s not so great when you want baby spinach and fresh picked brocolli. Although I did find some local raw honey at one stand which is unbelievably delicious. And there were some Spanish foreign exchange students who were selling zucchini and squash and beets. They were so excited for me to buy something, well it was probably more a matter of being excited for anyone to buy something. I bought a few zucchini’s and some beets, but mostly because I felt sorry for them. The students, not the vegetables. Here’s hoping that next week’s not quite as local, but probably better, farmers market will have a few more veggies. And more farmers. I am craving fresh produce. I hope your weekend is turning out delicious!
Sewing with Superglue
Do you remember this little raincoat I made out of a vinyl tablecloth a few weeks ago? I was talking to my cousin Jess not too long after I posted these pics and we got to talking a little.
 [ One of my thriftiest projects, total cost was $3 to make. Click pic for more pics. ]
She owns a hair salon and is constantly wearing an apron to protect her clothes from all the color she uses on her clients hair. Only problem is she is tall, so all of her color aprons are too short and she ends up with color all over her pants. And the other problem is they are mostly black, which is boring. All in all, her options were less than awesome. Well after discussing the merits of vinyl tablecloths and doing a little test run on a scrap (to make sure that hair color would come off vinyl) she asked me to make her an apron out of the rest of this floral vinyl. And you know how I am about making things reversible (skirts, other aprons), so we found another vinyl tablecloth, red to go with the flowers, and after drafting a pattern on sheets of freezer paper, here’s what I made.

I took it over to Jess at her salon yesterday. I hope it works out as we both planned! Because I don’t think I’ll be making any more projects with vinyl for a while. It’s a little frustrating. But working through that frustration I learned a lot about vinyl tablecloths. Here are my top three tips:
- Number 1– When sewing at top speed down a long straight seam the heat generated from the friction of the needle going up and down will melt the vinyl, which leaves some nice melty residue on your needle. So you need new needles.
- Number 2– Making long skinny apron ties from cotton backed vinyl is NOT a good idea. Because of the cotton which catches on itself, and the thickness of the vinyl it is impossible to turn them. Seriously, impossible. And I didn’t want any raw cotton edges to show because she works in a hair salon. And not only is it tacky, but little hair trimmings will stick to any cotton edge and that is just gross.
- Number 3– Due to the plasticy nature of vinyl, it’s also not an option to iron/press those edges under and then topstitch. Also due to the non-healing nature of vinyl, if you use pins then you end up with little permanent pinholes everywhere.
You can see where I’m going with this, right? After some serious frustration I sat down to think. And it took a while for the frustration to subside and for inspiration to strike, which is why this apron spent two weeks in pieces on the dining room table. How was I going to get this slippery vinyl to stay where I put it long enough to sew it down without melting plastic or making permanent pin holes. Answer? Super Glue.
 [ image ]
It was a brilliant idea. One of my best ideas yet. I used little/medium sized dots of superglue to hold everything I would have used pins for. The superglue is strong enough to hold that thick vinyl tight and dries fast enough for me to not go crazy with waiting. Also, when it’s dry it isn’t sticky so my needle didn’t get gummed up with adhesive. (Just with the melted vinyl I mentioned in #1.) On one side of the apron is a pocket and the other side has three loops where she can stash her scissors, combs, etc. I superglued the pocket down before I stitched it in place. And then I superglued those fabric loops before stitching them down as well. On the loops I stitched a box with an X inside it on each side of each loop to give it a little more strength. And I superglued some extra fabric interfacing behind it to try and keep the stitches from ripping through the vinyl.
I am not sure how well the vinyl will hold up with daily use. I guess we’ll have to see. But Jess, I hope you enjoy your new color apron! I’m adding this to Sew&Tell at Amy’s.
Permanent Magenta
I just came across the blog Permanent Magenta this week. And it is wonderful. Every day artist Margaret Owen completes a new oil painting, and she posts them on her blog, aptly subtitled “A Daily Painting Blog”. So if we are being honest, I’ve never really been a huge fan of oil paintings. I guess I took too many art history classes in college because when I think of oil paintings it’s mostly of old dead guys and their awkward looking poses with their awkward looking families set against fake ostentatious backdrops. And as a result the word “oil painting” conjures up images of stuffy basements of museums and old history books. But Permanent Magenta is anything but stuffy. Margaret Owen’s work is wonderful and fresh and colorful and full of life. Oh, and did I mention that she recently held a giveaway for ANY piece of work in her shop to celebrate 100 daily paintings? I found her blog the day after it closed and I am still kicking myself. What a prize that would have been! Anyway, here are some of my favorites from her shop where you can purchase originals and and prints, and a few from her flickr photostream.
 [ Yellow Eames Chair in her shop, print also available ]
So cute right! She has a few other Eames chair prints in blue and orange and green as well. I kind of want all four to hang up together. You know, in that new/old house that I keep dreaming about.
 [ To The Museum… in her shop. Painted from a vacation photograph and I love it!]
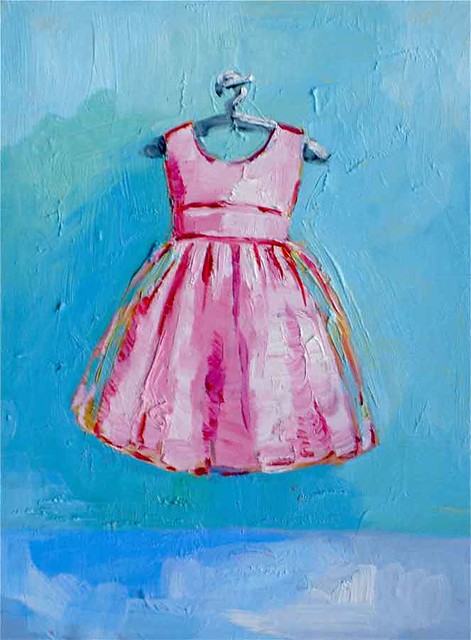 [ Painting #18, a very sweet pink dress from flickr ]
 [ And she can do amazing custom portraits as well. ]
 [ Puffer Fish print in her shop. I love that little face, he’s so cute (for a fish). ]
 [ Yellow Vespa with Pink Roses in her shop ]
 [ #66 from flickr. It makes me want cake. Or ice cream. Or both. ]
And then just a few days ago she posted this little cutie on her blog, and now it’s in her shop. I LOVE this one. It is by far my favorite of everything she’s posted so far. I love that I played with these little toys when I was growing up. I love the colors, I love the little suitcase. I love everything about it. And I want it hanging on my wall, and on the front of little notecards, or postcards. And as an “on vacation be back soon” sign for my virtual front door. I just can’t get enough of this little girl and her suitcase!
[ Girl with Baggage painting #103 ]
And if you’ve got a little boy who needs some great trucks hanging up on his wall, then check out her other shop grapplingdigger for a few garbage trucks and track hoe prints, like this one.
 [ Grappling Digger print in her shop ]
And see, not stuffy. Anyone who paints vespa’s and Eames Chairs, and garbage trucks and little people can not be stuffy. And as if completing a new oil painting every day didn’t keep her busy enough, she also makes darling little (and big) tote bags which are in her shop too. Here are two of my favorites, I am loving the little orange flower pins I guess. Which brings me to my second point that anyone who puts cutie orange flower pins on purses can’t be stuffy either. They can only be awesome. Super Awesome.
 [ Blue mini handbag lined with orange and with an orange flower pin in her shop ]
 [ June Big Bag, also lined in orange and FULL of pockets! in her shop ]
I love that every day on her blog there is something new to look at! And judging from her paintings (and particularly my favorites) I think her favorite colors to paint with are blue and yellow. And pink… which makes me like her even more! Go check out her blog, her shop and her flickr photostream. I’ve found dozens of paintings to love/favorite/heart and adore. And a new found motivation to try my hand at painting, you know with all those painting supplies that are hanging out in my closet just waiting for me to dig in. I am totally inspired by Margaret Owen.
Oh, and I still think this is probably the greatest thing I’ve seen in a while. Seriously. Adorable, right? I know. I am right! She is absolutely perfect.
Hello Beauty
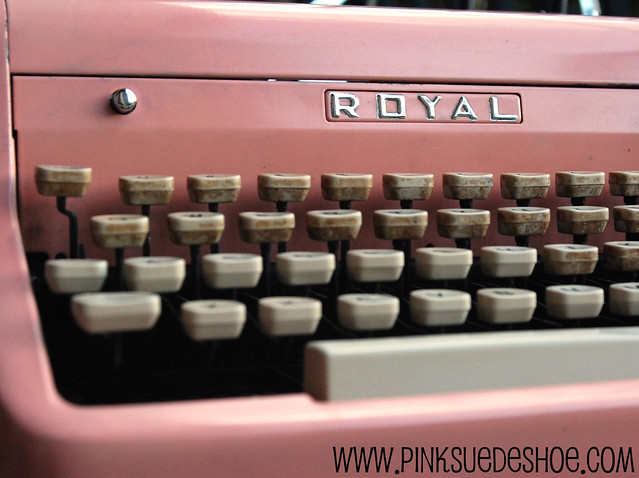
I want to introduce two favorites today. And I am so excited! First is Beauty. (I can’t believe that these picture are mine. That I took them at my house with my camera, and of MY TYPEWRITER. It doesn’t seem real.)


Sigh, she is just perfect. Everything about her is perfect. And even after looking at the pictures, and then looking behind me to the real deal, I can still hardly believe that she is mine. It was truly a Pink Week Miracle. I can’t bear to put her away, I want to see her all the time. And Creamie loves her too. She’s been living on my dining room table for a few days now and a couple of times every day Creamie will reach up on her tippie-toes and hit the space bar and say “Ding Ding! Thanks Stan.” It’s adorable. Which brings me to the next favorite I have to introduce to you.
 This is Stan. Stan the Typewriter Man. And he is wonderful. As soon as Beauty arrived last week I called Stan and asked him to take a look at her. And he cleaned her up and made sure everything was working perfectly and oiled her for me. I like Stan because he appreciates Beauty as much as I do. (And all other typewriters for that matter.) And I am so glad that I found him. Because without knowing him I don’t know that I would have been able to buy Beauty. I would have been afraid that something would go wrong and I wouldn’t be able to use her. And that would have been a tragedy. But after I found LOVE (my turquoise 1960’s typewriter) I found Stan. And then I found Beauty. Fate? I think it’s a little more than that. And now Beauty is back at my house, and she is clean and sparkly and more beautiful than before. Do you remember how dirty she was when she got here? I’ll remind you.
 [ Halfway through cleaning her keys ]
Years of grime and dirt and dust and who knows what else was covering this baby inside and out. (I know one “else”… little bugs. They were crawling out of her as I sprayed her insides with canned air. Shudder.) A few hours from me took care of most of the dirt on the outside, and then Stan took care of all the rest. Thank you so much Stan, you have made a dream come true, and I will always be grateful. Always.

Here she is. Shiny and new (looking) and ready for me to play. I’ve got some big plans for this little machine. Big, big plans. You will see her again for sure. She’ll be typing all sorts of things, just as soon as I figure out how all her Magic Margins and Tabulators are supposed to work. Does anyone happen to have a copy of the 1950’s users’s manual lying about? I could really use one.
I’m Dreaming About…
New shoes. I’m always dreaming about new shoes.
 [ image found via weheartit ]
Turning my handwriting into my own font at fontifier.com
 [ image found via weheartit ]
I should do something more with my hair than a ponytail everyday.
 [ I tried this a few days ago and really liked it, and I miss my pink hair. ]
A typewriter cake, in pink of course, for my next birthday. Or unbirthday.
 [ This cake from Paula’s Cakes ]
New pillows for my couch. I am in desperate need.

Actually, I’d like to tear my whole house apart and start over. Throw pillows will help tide me over. But what I really want is a complete overhaul with brighter colors and a much more eclectic look. Dark gray and orange, turquoise and lemon yellow and green. And a little pink. Crisp white trim. Vintagey/Modern furniture and dark wood floors. Really funky cool chairs and lamps and art on the walls. Obviously this is a far away from right now dream. But I’ll just keep looking.
 [ image from Apartment Therapy, found via weheartit ]
But what I really want most, more than any of that? What I really want is a beautiful old house with a detached garage and a backyard and a garden. With walls 14 inches thick, made of adobe. One with all the original woodwork inside, and built in cabinets everywhere you look. With a fireplace and huge windows everywhere. With skeleton keys that open all the original doorknobs. And quirky curvy stairs, and awful plumbing and wiring. And terrible shag carpet, but there is probably hardwood under there somewhere. And with a little love it would be absolutely perfect. And I used to live here, in my perfect house, but gave it up for homeownership. And I miss it. I love this house.

That’s what I really dream about.
Make Your Own Coloring Book

I made this little coloring book this afternoon for my nephew’s upcoming birthday. I’ve made a few of these now, and it is a very inexpensive gift with a lot of creative play built in. In my book that is a double whammy! Here is a how to.

Most of these things can be found around the house.
- About 100-ish sheets of plain white paper. Or you could print off coloring pages which are easy to find online and use those instead, or do a mixture of both. I used standard 8.5×11 paper, but you could use the larger legal (11×14) or ledger (11×19) size paper for a larger book.
- One piece of chipboard or thin cardboard the same size as your paper. I cut mine from the back of a cereal box.
- One piece of patterned scrapbook paper for the back cover. If you are making a large book, try a scrap of wrapping paper or wallpaper.
- Cropadile. I bought this tool years ago and it was a wonderful investment. It’s helped me make everything from coloring books to snowshoes. It will punch through about 20-25 pages at a time. (If you don’t have one, it’s OK. I have a few other ideas…)
- 2 Large clamps, or binder clips.
- 40 inches of ribbon, rope, string, twine, etc. If you are making a larger book, you’ll need extra.
- Glue, Ruler, Pencil and a needle with an eye large enough to string your ribbon/rope/string through.

To start off glue your decorative paper to one side of your cardboard. This is going to be your back cover.
 On one sheet of your white paper draw a line 1/4″ in from the edge of your paper. You could use either side, but I use the short side because the book seems to lay open better that way. Then mark a dot every 1/2″ from one end to the other, this is where you are going to punch your holes. I have 16 holes across my 8.5″ sheet.
 I took about 1/4 of my pages and stacked them up with a scrap piece of cardboard underneath. Then I clipped them together with my clamps to keep anything from slipping. Using my cropadile I punched out the holes I had marked with a 1/8″ punch. I like the small holes that this makes. If you don’t have access to a cropadile here are a few other options.
- Regular hole punch. This won’t go through as many sheets, so it will take longer, and your holes will be bigger, so space them a little farther apart. If you have larger holes, use a thicker string/ribbon/rope.
- Standard 3 hole punch. This will be a faster option than a small hand punch because it will punch more sheets at a time. You can adjust where the holes are by moving the posts inside the punch. You might have to move them three times to get enough holes. If you go this route, punch all your pages for the first spot before you move the posts to the second spot.
- You can take your paper and cover to your local copy store. A lot of largish copy centers (and copy centers inside OfficeSupply stores) have a paper drill. They can punch through a whole ream of paper with an electric drill, and they will be able to drill as many holes as you want. This might cost you a couple of dollars, so my suggestion is to do a whole ream or paper at once and make several books to make it worth your money. Also, call your copy center of choice first to find out prices, and to see if this is something they can do in house or if it is something they have to send out for.
- Super Old School way is to use an awl and a hammer and prick little holes in your paper. You’ll need to use very thin string/twine to fit through those tiny holes.
 After all your pages are punched, stack them up neatly with your back cover covered side out. Thread your needle with your ribbon/string/twine and find the center hole in your book. Since my book has 16 holes I started on hole 8. Starting at the top (white paper side) sew down through your holes to one edge of the book. Make sure to leave a ribbon tail about 12 inches long.
 When you get to the edge reverse directions and continue sewing back through your holes to the other side. That way you’ll have a solid line of ribbon and it will be stronger than a single stitched spine. Sew all the way to the opposite edge of your book.
 When you get to the edge, reverse directions again and sew to the middle where your ribbon tail is. Tie the two ribbon tails in a tight double knot. And then tie them in a decorative bow and trim the ends.

Now you’ve got a brand new book, full of empty pages ready to be filled with the latest masterpieces. Not much is more exciting to a two year old than blank white paper! Draw a little message on the cover and include a brand new box of crayons in your gift. (If it’s for a small person, get washable crayons. Their mothers will thank you.) Crayons will be going on sale soon for the back to school season so stock up. If you can get the crayons on sale you can create this gift for less than $2. And not much is more exciting to me than a gift full of hours of creative play and happiness that cost me the same as a large soda. Go forth and create! (To see any of these pictures bigger, please visit this tutorial on flickr.)
*** This tutorial is for personal use only. You are welcome to use this tutorial to make books for yourself or to give as gifts, but please do not sell items made from this tutorial. If you post pictures of something you made using this tutorial, please link back to this site I’d love to see your pictures. But please don’t post any part of this tutorial on your blog. Thank you. ***
Wide Eyed
I need a nap. Badly. And some chocolate cake, but that’s another story. I promise to be more wide eyed and bushy tailed later. Cross my heart and kiss my elbow.*
 [ The Eyelashes Antelope by mikel.hendriks ]
In the meantime I am going to wonder at nature for allowing this little antelope guy to have the prettiest eyelashes I’ve ever seen. Why can’t mine get themselves put together like that. Sheesh! I’ll have a new tutorial to post later today. After that nap. And a make believe cookie.
*Quote shamelessly stolen from my sister. She makes up cool stuff like that.
Bubbles
I am kind of overwhelmed at the response to my How to Cut a Watermelon post. Actually, overwhelmed doesn’t quite encompass the whole thing. I was totally shocked to see it as the featured food post on the WordPress homepage all day Friday and Saturday (update: and Sunday!). It is still a little bit surreal to me. So so cool, but so very unexpected. I took a picture. But it seems weird to post it here… frankly, it’s weird to talk about it. But do I want to say hello to my new readers. (Hello!)
 I had big plans to finish a cutie commissioned apron that has been languishing on my dining room table, but I got swept up in all the excitement and I’ll get to it tomorrow during naptime. So instead of doing what I was supposed to be doing, Creamie and I blew off the afternoon and instead of finishing our projects (hers are just stacking up around the house, let me tell you) we spent our time blowing bubbles.
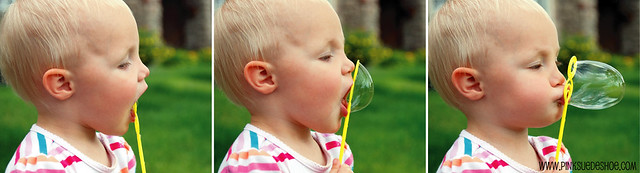 [ click this picture to see it bigger, and you should. she’s adorable. ]
It took her a little while to get the hang of it. And after a few bubbles in the mouth episodes she got it down. And at least once every hour she says “Bubbeee! Mama, Bubbeee!!!” Adorable? Yes. She actually got pretty good at it. And I know exactly how we are going to spend this afternoon. And tomorrow, and the next day…
“Bubbeee! Mama, Bubbeee!!!”


