Christmas Card Wreath
I’ve never sent out Christmas cards (Maybe next year?). That being said, I love to receive them, only I never know what to do with them all. So far all I’ve been able to come up with is to leave them in a stack on the table and then put them in a box/drawer sometime in February. It’s a super creative idea. I’m amazed that I came up with it all by myself. A few weeks ago I was browsing through old magazines and I saw this idea in Martha Stewart from December 2002. And I knew that with a few scraps from my box I could really make it my own. Day Four of A Handmade Christmas is a Christmas Card Wreath.
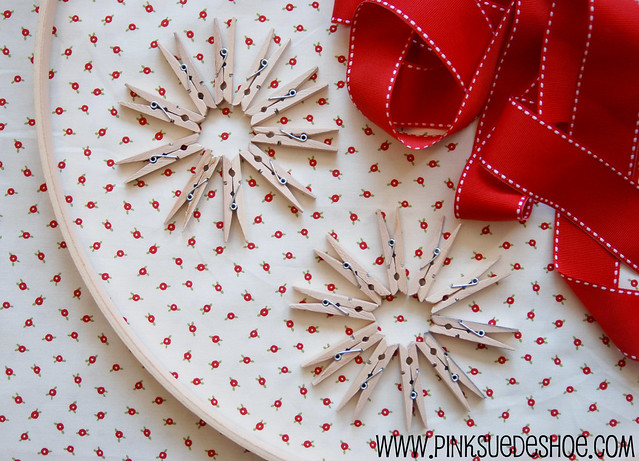
I started out with one side of an 18″ embroidery hoop, two bags of mini clothespins, and some wide ribbon. I spraypainted the wooden hoop black and while it was drying I went to town on the clothespins.

I found some teeny scraps in my paper box and cut them the same size as the clothespins. They were 2 inches long by 1/4″ wide. I just glued them on with a good layer from a gluestick. Then I used a Color Box Cat Eye Ink pad (Charcoal) to distress the edges a little bit.

Next I went through my jars of buttons and pulled out a few of my favorites to give it a little more personality. I also added a few rhinestones to a few of the clips. I attached these to the clothespins with E6000, but I think hot glue would work just as well.

Then I spaced my clothespins out around the wreath form and hot glued them in place. For an 18 inch wreath I used about 30 clothespins. (If I was making this again I’d glue the clothespins on in the centers, instead of closer to the button ends.) Don’t for get to leave a space at the top to hang it from a ribbon.

I hung my finished wreath up on the inside of the front door. But, everytime I opened the door the wreath would bounce against it. So I used a little bit of putty to stick the bottom center of the wreath to the door. And now instead of a lame pile of Christmas cards that I probably won’t look at again, I have a cute wreath of cards so I can see them everyday. I’m going to use the other half of the embroidery hoop to make an inspiration board/circle/wreath and hang it above my crafty desk. And I think I’ll make a smaller one for Creamie’s room to hold all the postcards my sister sends her from her travels. Happy Thursday!
Felt Reindeer Ornaments
Last night we picked out our tree, but it is still hanging out on the back porch. Something to do with forgetting to go pick up the tree stand from our storage unit… Oops.

Today for A Handmade Christmas I wanted to share an idea for my favorite little reindeer ornament. I’ve been making reindeer like this one for several years now. They are inexpensive, easy to do with kids, and grandparents LOVE them.

You’ll need felt in two colors, brown and tan, plus a few scraps of cream, black and red. (You can make this whole project out of paper instead of felt. It’s a little easier for small kids to handle by themselves.) One sheet of cardstock, a loop of ribbon, a little embroidery floss and hot glue. Trace your child’s hands and feet, and then cut out of felt. Add some embroidered details to the antlers and face to help give it a little dimension. I used all six strands of floss and just a simple running stitch around each piece. Make eyes and a nose out of felt scraps and glue or stitch them on.

Lay your antlers down on the cardstock and trim them so they fit together without overlapping. This will make the reindeers face much smoother in the end. Use hot glue to glue the felt to the cardstock. Add a loop of ribbon to hang on the tree and glue that down too. Then glue the reindeer face over the antlers and cut around the whole felt ornament.

You can add ribbons or jingle bells or sprigs of holly to the antlers to dress them up. Write the year on the back and hang them on the tree! Easy peasy. I’ve made these in the past with paper, which I mounted on foam core (bad idea, it was a huge headache to cut out foamcore fingers.) I’ve also used textured cardstock and chipboard. I’ve also tried to make these with heavy interfacing inbetween two layers of felt, but it was a nightmare trying to get the fingers to line up perfectly as I stitched them together. Gluing cardstock on the back is about a million times easier. I have also used combination’s of buttons, beads and googly eyes to create faces instead of bits of felt. They all turn out cute.
I’m off to work on some more Handmade Christmas posts, and to see what I can do about digging out that Christmas Tree stand. See you tomorrow.
PS- My Snowday Giveaway is open until Friday. Today was super warm and a lot of the snow has already melted. Boo.
Gingerbread Boys
When I was a little girl we would sometimes go shopping for our Christmas tree on Christmas Eve morning. We never had a lot of money, and usually by Christmas Eve the nice man at the tree lot would give my mom, three excited little girls in tow, our tree for free. And we’d take it home and set it up and spend the day decorating it. We’d start with as many white twinkly lights as the skinny thing would hold. Then we’d add the clothespin soliders my mom made years ago, and the pretty candles my dad brought home from Germany. Then we’d hang it with candycanes and red curly ribbon and in my mind it was the most beautiful thing ever. But my very favorite part about decorating those Christmas Eve Trees were the gingerbread boys. This is Day 2 of my Handmade Christmas series.

For as many years as I can remember my mom and my sisters would make gingerbread boys at Christmas. Sometimes they were to hang on the tree, and sometimes they were just to eat. (One year our dog found himself alone in the family room and ate every gingerbread boy on the bottom third of the tree. He even nibbled off the legs of the one’s just out of his reach. Poor guys, they went down bravely.) It was so much fun to sit around the dining room table together with stacks of gingerbread cookies ready to frost. Then we’d string them up with a bit of red ribbon and hang them up on the tree. With the candy canes and the candles and the toy soldiers I thought it looked like a Christmas dream come true.

I spent yesterday afternoon baking some gingerbread ornaments for our tree this year. I think we are going to get our tree tonight and then I can hang them up. So while I sat in the kitchen daydreaming and decorating my stacks of boys I got a little carried away. I usually do. I just can’t do them all the same. Though cute, those straight rows of buttons and happy smiles get boring.

This guy escaped from the hospital. He should still be in bed. You see, he was in a skiing accident and his face got a little sqwunched,* not to mention his buttons are all out of line and he’s still got a bandaged head and a cast on his leg. But he didn’t want to miss his big chance to be famous here on the internet. So he ran away for fame and/or fortune. Or maybe he hopped away, you know, on his good leg.

This guy was outside playing with his gingerbread friends. He’s wearing mittens and snowpants and boots, in case you can’t tell. They were having a snowball fight and this poor dude took one right to the face. No one told him to duck. Ah, the possibilities for gingerbread men stories are so endless. I absolutely love it. For the past few years I’ve made gingerbread boys for all of my neighbors. Each one decorated a little different. I think it was two years ago I was on a roll and made some football player Boys and an Astronaut Boy, and even Darth Vader Boy. I love making them so much. It always reminds me home, and it’s such a fun way for me to spend an afternoon. And seeing them all hanging up on my tree reminds me of how magical Christmas is for children. I mean, really, a tree covered with candy canes and cookies? Pure Christmas Magic.

*Scott and I just had a lengthy discussion about how there is no correct way to spell “sqwunched” because sqwunched is not in fact a word. (So he says. I was definitely on the other side of this conversation.) He kept telling me that in this universe it is impossible for a gingerbread boy, or any other boy for that matter to have a “sqwunched face”, skiing accident or no. In THIS universe his face would have to have been SCRUNCHED. Totally boring, predictable and unimaginatively scrunched. Lame, right? We finally decided that if you happen to be living in a parallel universe THEN you can have a gingerbread boy who got in a skiing accident which left him with a broken leg and a SQWUNCHED face. So…. that being said… hello from The Parallel Universe. I’ll be back soon.
RECIPE FOR GINGERBREAD BOYS TO EAT
1/2 cup butter Crisco
1/2 cup sugar
1/2 cup molasses
1 egg yolk
2 cups flour
1/2 teaspoon salt
1 teaspoon baking powder
1/2 teaspoon baking soda
2 teaspoons cinnamon
1 teaspoon cloves
1 teaspoon ginger
1/2 teaspoon nutmeg
Mix all ingredients together and turn dough out onto a generously floured surface, knead a few times to form into a ball. Roll cookies to about half an inch thick and cut out. Bake for 11 minutes at 350 degrees and cool completely on a wire rack before decorating.
DIRECTIONS FOR GINGERBREAD BOYS TO HANG ON THE TREE
Make these boys the same as above, but don’t use cloves or ginger or nutmeg. It’s ridiculous to use those expensive spices for something that your dog might possibly devour. And besides, after it’s been hanging on your tree for a month you’re not going to want to eat them anyway. So don’t waste the good spices. Don’t leave out the cinnamon, it’s cheap and it will make them smell delicious.
Roll gingerbread dough to about 1/8 an inch thick and cut out. Line them up on your cookie sheet and use a drinking straw to poke holes in their heads for hanging before you bake them. (Wow, that sounds so morbid.) You want these guys to be really thin. If they are too thick the extra weight of the cookie will make them too heavy and their heads won’t be able to hold them up. One night you’ll hear someone you’re pretty sure isn’t Santa crashing around in your living room and in the morning when you wake up the floor will be scattered with fallen boys. (Ask me how I know.) Also, you want to cook them until they are pretty dark, but not burned, just really crispy. If you hang them on a real tree they will absorb some of the water evaporating off your tree and if they get too soft, they will also break through their hangars and tumble to the floor. Again, ask me how I know this. So, roll them extra thin and bake them a few extra minutes.
ROYAL ICING
1 egg white
2ish cups of powdered sugar
1 pinch of cream of tarter (I only use 1/3 of my full recipe. It calls for 1/4 teaspoon, so whatever 1/3 of a 1/4 a teaspoon is. In my book that is a pinch.)
Beat until pretty stiff and spoon it into a pastry bag, or a ziplock bag with a teeny snip taken off the corner. Start with a teensy teensy snip, you can always make it bigger if you need to.
Christmas Tree Advent Calendar
Now that Thanksgiving is over the Christmas season has officially begun. And today I am kicking off my Handmade Christmas series with 12 days of my own tutorials for gifts and decor as well as Christmasy ideas and recipes. One of my goals for this year was to have as close to a handmade Christmas as possible. And I think I’m actually going to make it happen. I wasn’t really planning on making an advent calendar this year, but I got this idea sometime last week and I couldn’t get it out of my mind. So, my first Handmade Christmas project is for an advent calendar made of paper and a few scraps of felt and yarn.

Here are 24 little trees, each filled with treats and surprises for Creamie to open each day from December first through Christmas Eve. I’ve got three free templates for you to print at home,Small, Medium and Large. Click on each link, and the image will open, then just right click and print each file. It’s not a download. (And please don’t link directly to the file, if you want to share this project somewhere that is fine, just link to the actual post, not my pattern.) Each tree template will print on one 8.5×11 piece of paper, and any two trees will fit on a 12×12 piece of scrapbook paper. Here’s what you’ll need:
- Templates printed on cardstock and cut out (or if you have 8.5×11 patterned paper to use then just print right onto the WRONGSIDE of your paper.)
- Cardstock or paper, patterns or solids. I used 12 sheets of 12×12 green scrapbooking paper because I had it on hand. You could also use newspaper, vintage papers, or any scraps of wrapping papers or wallpaper you want to use to make this project your own.
- Tree toppers, I used a combination of homemade pompoms and felt stars.
- Hot glue gun

If you are using 12×12 paper and need to trace the templates, above is a handy diagram of how each combination of sizes will fit on your paper. If you printed the templates onto 8.5×11 paper, then you can just cut them out. I cut out 8 trees in each of the three sizes to give me 24 total. The base piece for each size of tree is the same, so you don’t need to keep those in order. Handy, right?

After you’ve got your pieces cut out, fold down the flap on the tree piece gently. Don’t crease this very tight or your tree will end up a little crooked. Believe me, I tried it. Then run a thin line of hot glue along the flap and shape your tree into a cone. Fold all of the notched flaps around the base in towards the center of the tree. Fill your tree with treats and use a little hot glue and attach a base piece to each tree (I mixed and matched all my paper patterns here). I’ve found that hot glue works much better than anything else. Gluesticks don’t hold tight enough, bottle glue doesn’t dry fast enough. I tried the scrapbooking gluedots/sticky squares as well and they just didn’t hold up very well. But hot glue dries fast and strong. I wish I would have thought of it first.

Then top each filled tree with a pom pom or a star cut out of felt, attached with a little hot glue. (I actually didn’t glue the pompoms on. I stuck them on the end of a toothpick and slipped them in the top of the cone so I can pull them off and use them for another project next year.) Then decorate your trees however you like. I had mostly patterned paper, so I left those as is. But my solid green trees got a little dressing up with a few spare buttons or a yarn garland. Just wrap some yarn around them a few times and glue or tape to the bottom. My snowscape is just a scrap of batting left over from a quilt I made last year, draped over books and crayon boxes for some height variation. The two silver cakeplates I bought at a garage sale years ago.

So lets talk about treats. I actually only filled about 1/3 of these trees with candy. I filled another third with our favorite non-candy snacks (craisins, fruitsnacks, crackers, hot chocolate mix, etc.) and the remaining third I filled with an idea of something to do. A handful of chocolate chips so we can make cookies, a cup of popcorn for Scott to pop, a little note with an idea to go look at Christmas lights, or watch our favorite Christmas movie, some of my favorite verses from the Bible to read together, etc. I also didn’t number any of my trees. (If I was going to I’d probably write them on the circle bases.) I figure Creamie isn’t going to be too respectful of going in order, being one and all, and I’d rather not tell her which she HAS to open each day. Besides, it will be a fun surprise!
Come back tomorrow for one of my very favorite Christmasy things. I used to make them with my mom and sisters growing up and they always remind me of home.
A Snow Day
Today was a good day. I woke up to 4 inches of fresh white snow, with flakes still falling. I love snowdays. They just seem so warm and cozy to me. I know that most people don’t love winter and the cold and snow it brings. But I love winter. I always feel so much more grateful for the many things I mostly take for granted. I have a heated home, and a warm coat. Living in a small condo we don’t have a lot of space, or a garage, but we have a snowcrew which means I don’t have to shovel. I have shoes with thick soles to keep out the snow, and warm socks. My windows aren’t drafty. I can have my towels warm and soft from the dryer instead of frozen on a clothesline. I have plenty of blankets to curl up under and stay warm. I have electricity, which means I have light to sew with until 1 in the morning if I want. I have a pantry full of food that will feed my family for 6 months. My car isn’t new, but it is dependable and has good tires and awesome windshield wipers. I don’t even mind driving in the snow. Because it’s so much faster and more comfortable than having to walk in it. Yes, I love winter because it truly makes me grateful for all those things that seem less important in the summer. Who is grateful for their heater when it’s 90 degrees outside?
 [ image via weheartit ]
And one of my favorite things to do on snowy days like today is to curl up on the couch with a giant sized mug of hot chocolate and watch the snow fall. It is my very favorite ways to spend snowy days. Creamie is right on track to love it too. She sat in the window with me and watched for a half an hour this morning. And that’s pretty good for a one year old. Anyway, to celebrate this perfect day I’m going to send you a surprise. Well, one of you. And, OK, its not a real surprise, because I’m going to tell you what it is first. But don’t ruin my moment.
 One of the great things about winter is the excuse to have hot chocolate before, after, and/or with every meal. I’m not a tea or coffee person, but I LOVE hot chocolate. Like, with a ridiculous passion. But I’m picky. I only like one brand, and it is absolutely not the stuff you get at Starbucks. Bleh. Stephen’s is a company that was founded in Utah a little over 12 years ago. And since the first time I tasted it, I was in love. They have a dozen different flavors, and I’ll send your choice of cocoa mix. I think I’ve tried almost all of them.
To enter leave me a comment telling me which flavor you’d like and your favorite thing about winter. And if you truly can’t think of anything, tell me one thing you are grateful for. I’ll close the comments on Friday December 3rd and randomly pick a winner on Saturday the 4th. Happy Snow Day everyone! [UPDATE: GIVEAWAY CLOSED!]
Here are the flavors: Dark Chocolate*, White Chocolate*, Milk Chocolate* (I always have this one hand), No Sugar Added Milk Chocolate, Chocolate Cinnamon, Mint Truffle*, Dulce de Leche Caramel*, Candy Cane Cocoa, French Vanilla*, Italian Amaretto, Chocolate Marshmallow, Mint Chocolate Marshmallow, Peanut Butter Cup, Roasted Hazelnut*, Raspberry Cocoa*, Raspberry Cheesecake, or Pumpkin Spice* (not a favorite). Or if you are not into Hot Chocolate, there is also Citrus and Spice Wassail* and Apple Cinnamon Cider* which are divine. I’ve put a star next to all the one’s that I’ve tried.
A Few Christmas Tutorials
I am so ready for Christmas. Actually, I’ve been so ready since September, when I started making Christmas presents for real. I have been working on a few (ahem, 12) tutorials for a Handmade Christmas series that will start on Monday, but while I polish off the last of the Thanksgiving pie and finish those up here are some other fun handmade projects that I love.

[ Pinecone Garland from Twig and Thistle ]

[ Felt bow from Twig and Thistle ]

[ Christmas Tree Garland from SadieAndLance ]

[ Paper Ornaments at mmmcraftss ]
[ Felt Christmas trees from Jenny B. Harris at Allsorts ]
[ And another one from Allsorts ]
And for last years list of the top 100 Holiday Crafts posted at The Long Thread, go here. Have a good weekend!
Happy Thanksgiving


A Blizzard and a Turkey
Tonight there is a blizzard warning. Temperatures are supposed to hit zero. The news has been saying that if you absolutely must travel to make sure you’ve got a winter survival kit. We are all cozy inside, huddled in the fort Scott and Creamie built in the living room. Creamie has all the flashlights out, one for each babydoll, and Scott and I are sharing the pillows. It’s the perfect way to spend a perfectly blizzardy night. I might even turn on the furnace. It’s been really nice to have my internet misbehaving the past few days. I sometimes need a reminder that the internet, though lovely, is not all there is to my free time. That being said, look how cute these things are.


[ By Brittany from One Charming Party, posted on Say Yes to Hoboken ]
Turkey AND popcorn? I’m pretty sure that this would be Thanksgiving Heaven for Scott. Pretty sure. We’ve got leftover turkey and stuffing in the fridge from First Thanksgiving (and there will be seconds and thirds). There is also half of two pies which I’m sure won’t be a problem to take care of either. Creamie is finally starting to feel better (for the record, 5 days of sick baby is totally lame). The fridge is full, the laundry is done, the dining room table is covered with my craft projects and the Blizzard is on the way. Right now life couldn’t get any more perfect.
A Snow Day for Me, and the Internet
It was one of those weekends. You know, the kind that are awesome in every single way, except for how they end. Creamie is sick for the first time in her short life, and neither she nor I know exactly what to do about it. So we are doing what we know. Extra coloring for her, and extra laundry for me.
 [ image via weheartit ]
But, the good news was that this morning when I woke up there was a light blanket of snow covering my world. When I opened the windows to show Creamie she said “Where the grass go? And the leaves?” Where are they? waiting. Waiting for winter to cover them up and give them a break from all that work they did all summer staying green and growing and stuff. Oh man I love winter. It is the promise of a fresh start for me. The snow reminds me of a blank canvas, ready for me to put whatever colors on there I like. And the best part about it? Next year I get another if this doesn’t turn out quite as I planned. I love it so much.
Also, posting may be spotty the next few days, our internet has apparently taken a snow day as well. Lame.
Dress Drama 2010

I’m doing a guest post for Amylouwho today. You can see the rest of my amazing stick figure drawings and read about Dress Drama 2010 right here. Have a good weekend!


