Toy Sack Tutorial
I mentioned a few days ago that I had been doing a lot of secret sewing. And this is part of it, 1/eleventh of it to be specific. That’s right, I was commissioned to make ELEVEN toy sacks as Easter gifts. It was three spools of thread and 33 yards of heavy 60 inch wide canvas and denim. Plus a full week of work. And while I was sewing I learned a few things, so I thought I’d share.

Now, before I get a million comments and accusations telling me I ripped of Toni Coward’s Lego Sack let me just state my business here. I actually made twelve bags. And the first one I followed her great tutorial. But because of the heavy canvas on one side and the denim on the other the drawstring was rendered utterly useless. By the time I got it cinched the opening at the top of the sack was 16″ across. Which is less than awesome for holding stuff inside. So I scrapped that first bag and did some thinking and then made eleven using this tab top method. (Tabs are WAY more economical than using grommets. For my eleven sacks I would have needed almost 300 of them plus I would have had to set them all!) If you want to use light weight cotton, you can use Toni’s drawstring method with no problem, but if you want to use denim and canvas for a sturdy bag? Well, then try this.

For my sacks I used 60″ wide dark denim on one side and a fun printed canvas/heavy upholstery/outdoor fabric on the other. These kinds of fabric are usually between 54 and 60 inches wide, which will give you a nice big sack without having to piece the fabric together. I bought all my fabrics at The Home Fabric Store because they have rolls and rolls of heavy, wide fabrics for super cheap. The denim was only $3 a yard and most of the others were between $4 and $6 per yard. (As opposed to most other places, Joann, Hancocks, etc where it’s between $15 and $25 a yard.)
For each sack you’ll need the following supplies:
- 1.5 yards of 54-60″ wide denim or canvas for each side. The stripe is actually a thrifted canvas like shower curtain.
- 5 yards of 1/4″ or 5/16″ twisted nylon rope. I bought this spool of 100 feet at Walmart for $11, they have smaller packages or you can find it at any home improvement store. ( The nylon twisted rope is much slipperier and smoother than the braided variety.)
- measuring tape, scissors, marker, general sewing supplies

Start by washing and drying both pieces of fabric. Since this is going to be something you might want to wash at some point, try and get all the shrinking/warping out before you sew your project. Then you need to cut them both into a large circle. In this one I only used a 10″ radius (which will give you a circle 20″ across) so it would fit in a picture. But when you are making your sack you’ll want at least a 24″ radius. More on that later. To make a perfect circle fold your fabric into fourths and use a measuring tape to make a mark along one edge your desired radius from the center. You could use a fabric pen, but I just used a Sharpie marker. Continue around your fabric, making sure to keep the zero end right at the point of your fabric. After you have a little mark every few inches connect the dots to make your cutting line, then cut it out. Unfold your fabric and ta-da! Perfect circle. Use this as a pattern and trace it onto your second fabric and cut out.
I don’t have pics of this next step, but you’ll want to make evenly spaced marks around the outside edge of your circle to attach your tabs. Fold it in quarters, and then quarters or thirds again to evenly space your marks. You’ll want at least 5 or 6 in each quarter of your circle. For this 24″ circle my marks were about 7 inches apart. (If you have questions on this ask them in the comments.)

Now lets make some tabs, without having to turn a bunch of long skinny strips inside out. Use the corners you have leftover after cutting your circles out and cut 2.5″ strips. This sack has a 24″ radius and I needed 24 tabs. I made a few other sacks that were a little larger, with a 28″ radius and I needed about 32-36 tabs. After you have cut your 2.5 inch strips iron one side down about 1/4″. Then fold the opposite side up about 3/4″ and press again. Fold the 1/4″ fold side down over the 3/4″ side so that all the raw edges are in the middle and press again. Then stitch down the center of your tab. For this part I moved my needle over to the very far left side of my machine because my presser foot has a handy guide to help me sew right on the edge over there. Then cut your strips into 4″ lengths.

After your tabs are all made, pin them to your marks on your circle. Fold each in half but with offset ends and center on each mark and pin. The offset ends will mean you aren’t sewing through as many layers of fabric at a time. Make sure you are pinning them on the RIGHT side of your fabric, with the raw edges lined up and the folded end of the tab pointing towards the center. Continue pinning all your tabs in place and then sew around the entire perimeter of your circle about 1/4″ from the edge. (True, you don’t need to sew between each tab, but sewing in one big long stretch is a lot faster and more thread efficient than just sewing each tab and cutting your thread and moving to the next one.)

Next pin together the right sides of each circle, so the tabs are sandwiched between them. And don’t freak out if it seems your two circles are not the same size and you have a gap of fabric left over when you are done pinning. Just keep going around your circle again, stretching the “small” side a little as you repin it until you’ve used up all that gapiness. Only 1 of my 12 bags lined up close enough to skip this step. After you’ve pinned your two circles together sew them together about 5/8″ from the edge. You want to make sure you are inside your first line of stitching. Leave at least a 10″ opening to turn it inside out. A little too big is way better than a little too small. Before you turn it inside out clip the curves all the way around, about an inch to an inch and a half apart. When you get to a tab clip on each side of it, don’t try to clip through all that fabric at once. Clip your 10″ opening as well.

Turn your sack right sides out and use those tabs to help you pull out all those edges. Now you need to use a good hot iron and press that outer seam as flat as you can get it. Carefully turn the opening under, press and then pin it closed.

Sew around the edge of your circle again, this time only about 1/8″ from the edge to finish things off and close up that opening. You might need to sew slower as you go over the tabs. There is a lot of layers of fabric in there. For this project I didn’t use a denim needle, just a new sharp universal needle and didn’t have any problems. If your standard needle is having trouble sewing through all those layers switch to a denim needle and go slower. Finally, string your rope through the tabs and tie a knot in each end to keep it from pulling out easily. It will still fit through the tabs, but it will take some working. The ends of nylon rope frays easily, so you are going to want to either burn the ends, or wrap them tightly with clear tape. I voted the tape route because I hate the smell of match smoke. Also note: If you used a radius over 26″ you might need a little bit more than 5 yards of rope.

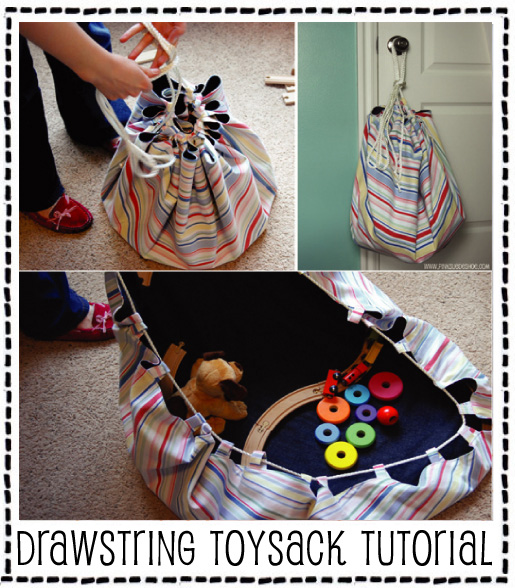
Because of the rope and tab closure this sack/play mat is completely reversible. So Creamie has been using the striped side as a rainy day indoor picnic spot for all her best friends.

And the other side is for her trains. She got some new tracks for Easter (this is an Ikea wooden train set) and she is all ready to lay down more tracks and go on more adventures.

And when you are done playing just cinch up the rope and tie it in a slipknot to hang over the doorknob, from a hook, or just leave it in the corner. The mess is happily contained until it’s time to play again.
*Once again, this tutorial was inspired by the Lego Sack by Toni Coward, but was written specifically for heavier fabrics like denim, canvas, heavy upholstery and outdoor fabrics.




This is so cool!!! Love the idea.
I loved this tutorial! Thank you!
Absolutely adorable! Would be so great for a take to the park to have a picnic bag too. Thanks for the tutorial, yours are always so great!
I just had another thought on this…thrifted table cloths, would be perfect for this too!
You have been busy! Go Girl!! I love the idea of the bag being big enough to use as a play mat. Brilliant.
Uh hem, Pyrex?
🙂
These are so cute! I love that it is a play mat in addition to a sack. Definitely makes for easy clean up 🙂
I love these. Great call on the tabs with the heavy fabric. I made one (Toni’s version, though) for my girls’ princess stuff–a grassy print on one side, blue on the other, so the princesses can play at the park in the grass, or at the pool. Love the versatility.
I am still in awe that you made 11 of them without breaking a needle. How did you finish the ends of the cord? Just melted? Do the ropes come out of the tabs (I can foresee a few little ones wanting to jump rope or walk the “dog” with such a rope if it does come out…)?
Love it!! That is so cute!! Your photos look great 🙂 What a cute little “tea party” with the baby, dog, and bear!
That is fabulous! and what cute pics.
How totally awesome! These would make really great gifts, or if I ever have another anklebiter I’ll make a few for sure.
Pink,
You are
eleventwelve kinds of awesome. Do we get to see the rest?xo -El
P.S. Creamie is adorable.
Way to rock the tab sack! I wish I had made one of these 13 years ago – I much prefer the idea to plastic tubs for the Lego (and less scrapage up of gunk along with Lego blocks off the floor and into said plastic tubs!). I hope you get to relax a bit this week, but I know how much you love sewing, so I’m sure you’ve got some other fabulous project up your t-shirt sleeves.
Where were you when i was raising my own children? This is the coolest idea I have seen in ages!
Since you used such heavy fabrics, would it work for picnics?
Wow, what a clever idea!
I was inspired to make one of these for my friend’s grandson’s 1st birthday party this weekend. In the true spirit of using up the fabrics in my stash, mine is a bit smaller . . . about 42″ in diameter . . . soft denim on one side and a navy/white check on the other . . . I’m using some heavy grosgrain ribbon for the tabs in stripes of red, blue, green, & yellow for a punch of color and will have to buy something for the drawstring. It’s all cut and ready to stitch . . . but the grocery store is calling me to hunt and gather for the cupboards. Thanks for the inspiration!
Janie
such a awesome, fabulous,clever idea!!!att.net
I just made a bag from your tutorial. Thanks so much for the well written description. Mine will be used to hold a fishing set for a christmas present and after that who knows. Keep up the great sewing!
Fantastic Tutorial … thankyou so much for taking your time to do this, I have made 2 allready as gifts and they were both BLOWN AWAY by how fantasic these are!
Thanks again!! x
Thanks for the tutorial! I used heavy twill on one side and a cotton print on the other to make three of these bags today. I am going to have to read this through again to see how you deal with the excess rope when the sack is closed up.
Yes, there is a lot of rope. 🙂 I just folded it in half and tied a big slip knot to hang it on the doorknob. It has seemed to work pretty well.
Seriously, this will make my life so much easier!!!
LOVE THIS!! I have been wanting to make one of these for our Legos!!
This is the perfect thing for my girls when it comes to their teddy bears picnics, all the play food cleared up with one pull of a string. Would stop the ‘im too tired to put my toys away’, i must try this thankyou
Thank you for this tutorial. I too was stymied by the heavy weight fabric combo and the huge number of grommets it would require. Love the tab idea. And for the excess rope when the bag is cinched, wrap it around the top of the cinch, sort of like a hangman’s noose. It will hold your bag extra secure and keep small toys from sneaking out when you transport them.
Hi there, this is awesome! Cheers! For my son’s, I am using backpack strapping for the tabs and parachute chord to cinch it with.
Hi
Terrific idea! I’ve done the cutting and wonder if you have tried grommets around the edge to hold the rope?
Hi,
I have thought about grommets, they would be a great option! I opted for tabs on this one simply because of cost. I was making 11 or 12 for a custom order and the grommets were just too much money. They doubled the cost of materials, and I already had scraps from the cutting out the circles. But if you were just making one, or the price wasn’t an issue grommets would be great!
e.
>
What’s Taking place i am new to this, I stumbled upon this I’ve found It positively useful and it has aided me out loads.
I’m hoping to give a contribution & help different
customers like its helped me. Great job.