Art Journal: New Goals
Today’s art journal page is about some new goals I set for myself. When I was growing up I never wrote in a journal, or a diary unless my mom made me. So that means I have very little to look back on and remember what I was like. I started keeping my own scrapbooks in junior high, but everything before then can be summed up in a few sentences on mostly empty pages of my journal. At the beginning of the year I made a goal to write more. Everyday. But when Creamie and I were both sick for 4 months at the beginning of the year, that goal got pushed aside for things that were more important. Like snuggling with my sick baby.
I’m trying to get back in the habit of writing everyday. I am still working up to it. It will probably take a few more months before I am back to not skipping a single day. My new goals for right now, just a regular old Wednesday in July are hopefully the kind that I don’t fall out of the habit of working on. No matter what happens, I hope that I can stick to these few things. Because they are important.

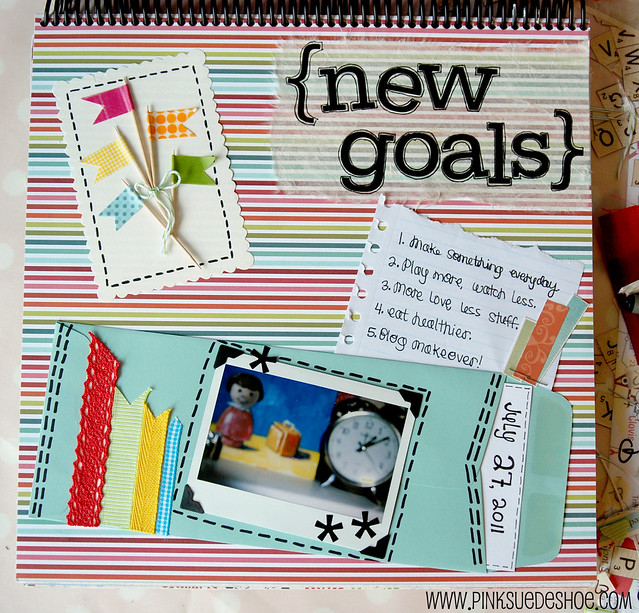
1: Make Something Everyday (even if it’s just dinner). 2: Play more, Watch less. 3: More love, Less stuff. 4: Eat healthier. 5: Blog Makeover. See, they are important. Well, except for the last one. A blog makeover isn’t really important in the whole huge scheme of things. But it’s about time… this blog has looked the same for a long long time and I think I’m ready for a change. It’s going to be my reward for improving on the other four. So I hope it is soon. Soonish.

I made some more little washi tape flags with toothpicks, and then tied a piece of bakers twine around the bottom of them. I could seriously add washi tape flags to every single thing I make, cook, or give away. They are probably my very favorite thing to make while I try to think about something. Quick, easy, mindless and adorable. Perfect. (Washi tape and twine from this shop.)

And just so you can all see that I am a real person who makes a lot of very real messes, this is what my desk looked like after 2.5 pages in my art journal. Monday afternoon before I started it was completely clean. And boring. Now it is much more fun. I do have like 6 Sharpie markers, and only one of them has a clean sharp tip… I really should put the other 5 somewhere else, because whenever I need that marker I end up opening up 3 or 4 before I find that nice new tip. Will I actually do it… probably not. I hope your Wednesday is lovely. I am going to get my hair turned from peachy-not-very-pink-anymore back to blonde this afternoon. It’s time.
Art Journal: Where am I going
I am coming to a crossroads in my life. I can feel it. And I know where I want to end up, but I don’t know exactly how I am supposed to get there.

You’ve all felt that way, right? And the more I think about it the more I think, what if what I want right now is not what I am supposed to do. It’s a lot to think about, and I wrote myself some notes about what I want right now, and what I think I need to do to get it. Of course, one thing can change the course of a life in an instant. I guess we’ll see what happens.

It is a never ending circle of thinking and planning and changing. This quote from Joseph Campbell is one I think about all the time. “We must be willing to let go of the life we have planned, so as to have the life that is waiting for us.”
Art Journal: Start Fresh
Well, I did it. This afternoon I worked on an art journal page for the first time in months. It felt good. I got glue on my fingers and tape on my pants. And I had forgotten how therapeutic this is for me. I am really glad I gave myself the challenge to make a new page each day this week. I am going to love spending time doing this!

I have a box of stuff that I use on my art journals, plus anything else I can see hanging out that is the right colors. This particular page was inspired by the colors that Shimelle used on this page, which ironically was inspired by this photo. I love how inspiration feeds on inspiration. On this page I used springy colors, because starting fresh just seems like a springy colors kind of feeling. A little (ok, a lot) of washi tape, a bit of vintage lace and fabric and a new paper doily finally came together to make this page. I’m out of practice and this took a lot longer than I thought it would!

This would be Instax photo #3. This one I took with the closeup filter. The hardest part is not being able to see just what things are going to look like, and do a few test shots to make sure you have what you want. Shooting with this little camera is going to be good for me I think!

I added a few layers of fabric flowers with some ribbon and a vintage button to give myself some dimension… and really, the flowers were just sitting there on the shelf, and if it is the right color, it goes into the pile on my desk. Sometime this week I’ll have to take pictures of the giant mess I create while I am making things. It’s ridiculous!

Anyway, I’m off to bed, we had a late night at a family party, where I made some delicious raspberry lemon ice cream. If we hadn’t eaten it all I would be having a raspberry lemon midnight snack! More art journals tomorrow. I think I’ll dream about them tonight…
Time to make something
I think we’ve turned a corner here at my house. After going more than six months sans afternoon naps, I think we are back on schedule. Creamie has taken naps 7 of the last 10 days. And still had a mostly normal bedtime. We’ve both had to wake up a lot earlier to make this miracle happen, but it is working.

And that means I now have time in the afternoons to myself. Which is amazing. I think this week I’m going to work on my art journals. I love doing it, but I haven’t made any new pages for a long time. For my birthday (almost six months ago!) my dad gave me a wide format Fuji Instax camera. And today I finally took it out of the box, loaded the film and took my first two pictures. I’ve been very inspired by Rachel’s Month of Instax project while her hubby was away with the military. And today after Creamie fell asleep I finally got the guts to push that button and watch the picture magically appear… with no editing possible. That is the part I am afraid of. And I know I have a lot to learn about the camera before I can take goodish pictures all the time. First thing I learned is that I need to aim high. Well, higher than I thought.

When I talked to Scott at lunch and told him Creamie was sleeping I promised not to spend her entire nap on the computer. So I’m off to get glue on my fingers and paint underneath my fingernails. I’m going to try and post a new journal page everyday this week. I don’t know that I can commit myself to a 30 day project yet, but I can totally do seven days. I think.
Sewing with Friends
A few weeks ago I had a party at my house. And not just any party, a special one. My friend Amy was in Utah visiting her family earlier this month, and while she was here I offered to host a party for her so she could meet all her online Utah friends in real life. For a while now she has had a weekly (now it’s a monthly) feature on her blog called Sew & Tell. It’s basically a link up party but with friends who will give up advice on the middle of your project, or congratulate you on finally finishing that really old project that has been kicking around your house forever. And while she was here we decided to have a live version of Sew & Tell. It was so much fun, and it made me realize how wonderful the internet is for bringing like minded people together.

From left to right we are Amy, Diary of a Quilter, Amy, Vintage Fern, Erin, Two More Seconds, Leigh, Leedle Deedle, Elizabeth, Such a Sew and Sew, Vicki, Sew Inspired, me and Amy, amylouwho. Thanks amylouwho for taking pictures!
We all brought a sewing project we had been working on, or just finished and we had plenty of good food and great conversation and had a great night together. A few of Amy’s friends weren’t able to make it (there was a giant rain storm that day!) and so a few days later we did it again. But this time we met at The Material Girls quilt shop in South Jordan, which is owned by the wonderful Nadine.
 From left to right: Calli, Make it Do, Amy, Amylouwho, Sara, Sew Sara, Vanessa, V & Co. Amy, Vintage Fern, Nadine, Material Girls, Amy, Diary of a Quilter, Megan, Quilt Story, Erin, Two More Seconds, Shari (hiding in the back), Doohikey Designs, me and Leigh, Leedle Deedle.
We had dinner together and spent the evening looking at fabric, chatting, laughing and while we sat around the work tables in the back room. It was another wonderful way to spend the night. I don’t think I got home until well after midnight!

Erin (Two More Seconds) and Vanessa (V & Co.) picking out fabric. Nadine has amazing taste in fabric, not to mention she orders everything. We all came home with a little something new!

This is just one wall of her not very big, but absolutely packed store. And thanks to Amylouwho for showing me how to use her flash. I bought an off camera flash for Scott years ago (he knows WAY more about photography than I do!) and since she showed me how to use hers I haven’t been so afraid to use ours.

[ Nadine, owner of Material Girls and Calli picking out fabric. So much fun! ]
Thanks Nadine for keeping the shop open late just for us. I had such a great time listening to stories and laughing with everyone. It made me realize that I need to get together in real life with people who share my interests a lot more often. These women felt like old friends. And I don’t know a single person that doesn’t need more old friends.
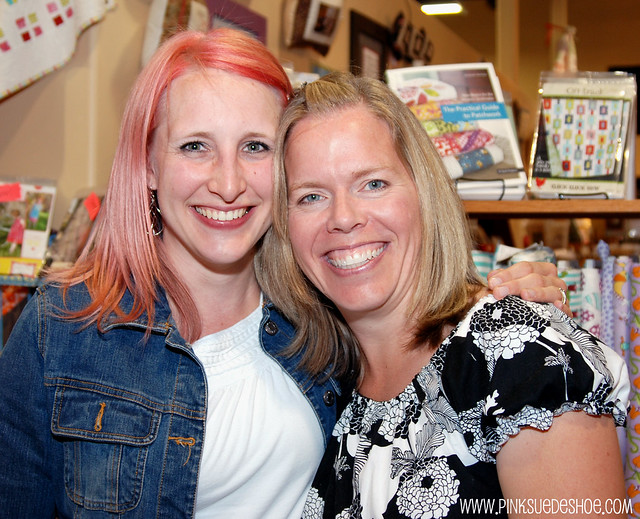
And thanks Amy for coming to Utah to give the rest of us a good excuse to get together. I spent a few more nights hanging out with Amy, and I can’t wait for next summer to hang out again. And as for the rest of the amazingly talented women I had the privelege of hanging out with… lets do it again. Soon.
A new old skirt
Last weekend I decided I needed a new skirt. So I dug through my stash of vintage sheets and pulled one out that looked promising. I cut off three long strips and after a little gathering and a little elastic I had my new favorite thing to wear. I used the original hem of the sheet on the bottom ruffle of the skirt so I didn’t even have to rehem. I also left the original label sewn into the hem, which I think is cool. I did have to line the whole thing, because this sheet was a little sheer. And while I don’t particularly care for the butterfly motif, I love the overall look and color scheme. I’ve only had it finished for a week and I think I’ve worn it four times. I clearly need to make myself a few more skirts before summer is over!
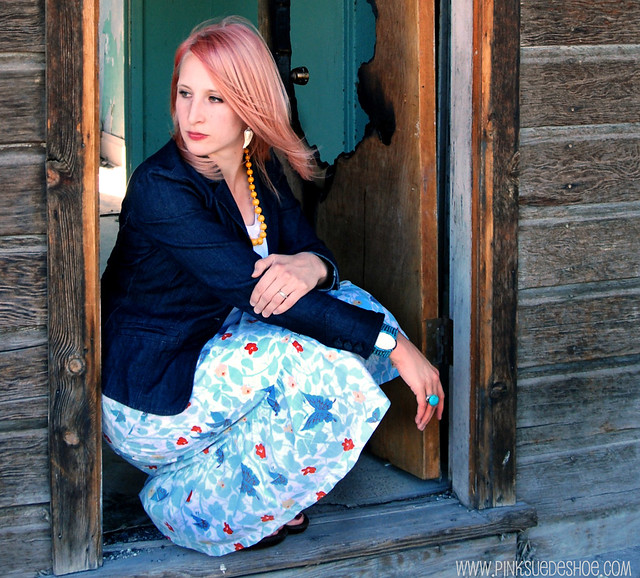
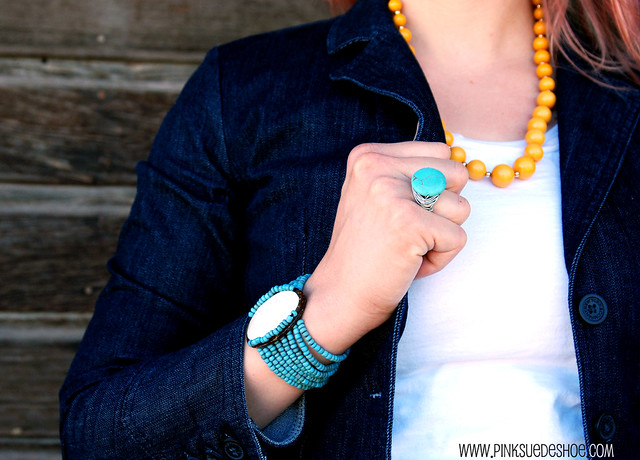
[ My very favorite denim blazer: New York & Company 3 years ago, Skirt: handmade from a thrifted vintage sheet, Earrings & Turquosie ring: handmade by my friend Adrianne, Necklace: thrifted, Bracelet: swap meet in Honolulu 3.5 years ago, Sandals: Steve Madden hand-me-downs from my sister, white tee: Walmart, yellow purse (a few pics down) NineWest, thrifted ]
Last night we went out on a date and we started out at this old abandoned house. I’ve driven past it a million times but this was the first time we’ve stopped. It was awesome, and creepy, all at the same time. The walls inside were full of cracked plaster and peeling wallpaper.

The walls in the kitchen of this old house were bright turquoise. You can kind of see them in that first pic. I wish I had a better picture of them, but they were so pretty. And with the broken out windows, the burned out door and the rickety old back porch it was a very unexpected surprise. I think I’ll go back here again. I don’t know how long it will be before this old house is torn down and I know I’ll miss seeing it when it’s gone. I hate seeing even the ricketiest old buildings demolished. The land around this one has been slated for a strip mall for years.

So I mentioned a few days ago that my pink hair faded a lot while I was scuba diving. I like the color in this picture a lot more than I like it in the mirror… the back has faded a lot lighter than the front. So we’ll see how long it takes before I do something else. I hope you have a great weekend. We are going to clean out our storage unit (bleh) and if I get lucky I’ll sneak in some sewing time to finish another skirt. Update: I ‘m adding this project to the Project Restyle flickr group, and Sew and Tell at Amy’s!
Fabric Bunting Tutorial
I started this project 3 weeks ago, but it shouldn’t have taken more than one evening to make. But I had a minor binding crisis and after eating a lot of cupcakes I unpicked a whole bunch of stitches. And started over. And I like round 2 a million times better. And I still have another stack of scraps to make a few more of these pretty fabric buntings. Pretty sure that these are the most versatile thing I’ve ever made. And here is the how to.

You can download my Bunting Template and print it at home or you can make your own template with a paper plate or mixing bowl or whatever else you have hanging around. My favorite mixing bowl (and therefor the template)is 8.5 inches across, but I also included a mini version at 5.25 inches across. Trace your template onto cardstock or thin cardboard like the back of a cereal box. I choose the rounded shape over a triangular pennant shape because I think you can see more of the fabric that way.
Pick out some great fabric. All of mine are either one color with white, or a tone on tone print, because that is mostly what I am drawn to. If you are going to use my large template you’ll need a piece of fabric 7.5″ x 17″. (The mini size uses a piece 4.5″ x 11″.) Each flag is about 8 inches across finished, so figure out how long you want your bunting to be and use however many flags you’ll need to achieve that length. For my 6 foot window (where this is going to end up hanging) I used a 7 and a 9 flag bunting together. OK, let’s get started.

Fold your fabric right sides together and trace your template with a pencil (I used a pen so you can see it). Then pin the pieces together with the pins well inside your traced line.
I pin them this way because it holds the pieces of fabric together while I cut, and then it is all ready to sew together without having to repin everything. And I am not talented enough to sew around curves without pins. When you are all pinned, cut out your pieces.

Now sew around those curves (leave the top straight side open) with a 1/4″ to 3/8″ seam allowance. I just lined them up on the edge of my presser foot, because that is the easiest way for me to keep a uniform seam. Pull the pins with your left hand (which might feel really backwards) as you sew. Or if you pin them far enough on the inside of your shape you can just sew the seam and then pull them out when you are done.
After your flags are sewn together, clip the seams every 1/2-3/4″ around the curves so it will lay flat when you turn it inside out. Don’t snip your stitches. If you do, go back and resew that part.

Turn your flags right sides out, push out the curves and press around the edges so they lay flat. I found it was faster to do these assembly line style, so do all the sewing, then the clipping, then the pressing.

Lay out your flags on the floor to get them in the order you prefer. Now that I am all done I wish I’d switched the top left light pink with the bottom right dark pink. (Why do I always see this in pictures after the fact?) Oh well. I choose to do two separate buntings, but I wanted to hang them up together, so I arranged my colors so they’d look good by themselves or hanging up together. If you make one long bunting (like this pink one, or this red white and blue one) you can still get a dual look by doubling the bunting back on itself when you hang it.

Next choose a bias binding. You can use a prepurchased double fold binding, or make your own. (You’ll want a bias binding so that it will hang with a smooth curve.) My first round I choose the wrong thing for my binding. After I was finished sewing the whole thing together I realized it was too bright, and had too much white on it. So I unstitched it and found a new fabric which is a little more neutral. (This green is a Heather Bailey print from the Nicey Jane collection.) I cut 3″ strips on the bias, folded it in half and pressed it and then folded the sides to the center and pressed it again, making my binding about 3/4″ finished. Next time I’ll make it smaller at 1/2″ finished, I think. I used 11 feet of binding on the 7 flag bunting and a little over 12 feet on the 9 flag bunting.

Start sewing your flags on! I sewed my binding together for the first 30ish inches so I had a long tail to tie my bunting to curtain rods or nails in the wall or whatever. This will also give you a little wiggle room when you hang it up so you can adjust the length easily to fit your space. Then just tuck in your flags, making sure that the raw edge is all the way to the middle fold of your binding. Sew along the edge, carefully, so you catch the top and bottom edges of your binding, and leave about a half inch of space between each flag. When you are finished with the flags sew another 30ish inch long tail so you can hang your bunting up easily.

Tada! Finished fabric bunting that you can reuse for years. I hung it up on the wall in my craft room for a picture, because taking pictures of something hanging above a window is hard. And I can never get the settings on my camera right, so it ends up totally dark or way too bright. So wall photo it is. I just used two long sewing pins stuck in the wall to hold it up. But I think I’ll hang a curtain rod over my window so I can just make loops in the ties and hang them up that way. And now that I’m looking at pictures, I really think I might switch those dark and light pinks on the edges. Which means just a little more unpicking.
Review: Zermatt Resort and Homestead Crater
Last weekend I had big plans to stay home and do nothing. But that all changed when April (Sweet Life in the Valley) told me about an opportunity to spend the night at the Zermatt Resort complete with dinner and scuba diving and eating cookies with a bunch of girly bloggers in exchange for a blog review. I jumped at the chance.

I drove up the canyon to beautiful Midway, Utah with my new friend Erin from Two More Seconds. (She is putting together the Sewing Summit this fall in SLC.) Midway was settled by Swiss immigrants and the Zermatt Resort has a very European feel, dancing bear statues and bellhops in traditional costumes included. We checked in at the main lodge and then headed over to dinner at Schneitters Restaurant.

Schnitters has a new chef and a new menu and we got to taste a lot of their new dishes. I think I counted 8 courses? I don’t care for seafood, so I didn’t particularly enjoy the shrimp cocktail or the crab dip, or the corn and crab chowder. But I tried it and it was good, for seafood. They brought us hot rolls, which were fabulous, and we got to taste their amazing wedge salad. I’ve never tasted a salad that was more delicious. Life changing delicious. Really. I mean, if you top it with bacon it’s gonna be good anyway, right? The main course was a tasty chicken, pasta and veggie dish with asparagus and zucchini and sun dried tomatoes in it. Then we tried a smattering of desserts, none of which were totally impressive. Their strawberry shortcake was my favorite of the three, but I wish it had been fresh strawberry sauce (like mine) instead of cooked. I’m just picky when it comes to dessert I guess. But it was fun to hang out with girls and talk blogging and internet and social networking. Oh, and when you go out to eat with a bunch of bloggers, this is kind of what it looks like. (Really, click that link, it’s HILARIOUS!)

After dinner we hung out at the pool and the hot tub for a while, and then went back to our rooms to eat more cookies and ice cream cones and talk more blogging and internetting and stayed up far too late enjoying the whole thing. We stayed in a few of the villa’s, which were awesome. Lots of beds, lots of bathrooms and a nice kitchen. They would be a wonderful place to go with a lot of family or friends for a getaway or a reunion. (As long as you didn’t have to sleep on the sleeper sofas. The beds were great, sofas? not so much. Erin, I still owe you for switching me!) Saturday morning we had breakfast at Fanny’s Grill which is across the street from the Zermatt Resort at the Homestead Resort. (Both were purchased by the same parent company last summer, so they like, do stuff together and everything.)
 [ Image of the Homestead Crater interior from the Zermatt Resort]
After breakfast I went here. The water from a natural hot spring has hollowed out the inside of a limestone deposit that is shaped like a 55 foot tall rock beehive. Yeah, cool. It is called The Crater , and people have been soaking and swimming here for more than 100 years It is as warm as a hot bath, 90ish degrees year round. (That’s 32 for you celsius people.) And the water is clear and bright blue from all the minerals (the blue in the picture is really accurate). Plus it has a 65 ft deep pool of water to scuba dive or snorkel or swim in, but it is located at over 7,000 feet above sea level. Pretty freaking awesome. Our coordinator at the Zermatt Resort dropped the ball and forgot to schedule us for the scuba session we were planning on. So when we arrived they told us that we would only be able to swim in the Crater. Which would still be a nice warm soak in a mineral hot spring, but it was pretty disappointing. But as David (I think he is the Manager at the Crater) was helping us get our forms signed and our life vests on it came up that we had hoped for little scuba-ing. And he called someone else to watch the front desk, dropped everything else he was doing and made sure we had an awesome experience.
 [ Image from the Zermatt Resort. That isn’t me, but it could have been, it looks just like this! ]
After David hoisted our vests and tanks and tubes into the water we had a quick 20 minute chat about how to breathe underwater and how to not get the bends and basically how to not die or drown. And then down we went. And it was awesome. Now, let me just tell you that I am not a diver. I’ve watched people go diving from the boat, but jumping in a lake or an ocean where there are live creepy crawly things is not on my bucket list. But thanks to the last minute schedule rearranging by David I was able to go under in full scuba gear and have an amazing scuba experience for an hour without the chance of being eaten by a shark, or nibbled by a turtle or a carp or something. And besides the warm safety of scuba diving at 7,00 feet above sea level, I had one of the most beautiful experiences ever. As I swam around with 80 pounds of gear on my back I happened to look up. And I stopped swimming and just stared for a while. I was about 40 feet under the surface but I could see the sunlight filter down through the blue water in a warm hazy glow. The only thing that was moving was the bubbles rising to the surface, and all I could hear was the sound of my very loud oxygen tank breathing. But it was incredible. I could have stayed there forever, I felt like I was in another world.
 [ Karen, Dive Master David, Katie (18 year old certified rescue diver!) Heather and me.]
I also overcame one of my other irrational fears. I stood there out of the water, but just in my swimming suit for about 20 minutes. First time in my life that has happened. It was a weekend of first I guess. As far as scuba diving goes The Crater probably isn’t the most stellar experience ever. It is small, it doesn’t have a sunken ship in it or buried treasure. It’s not a coral reef or the caribbean ocean or anything like that. But I did go scuba diving in a nice and warm mineral hot spring 7,000 feet above sea level. And you won’t get that experience anyplace else in the world. I don’t think.

Up until 1996 you had to climb down a rope ladder into the Crater through this opening in the top of the dome. They have since blasted a tunnel through the rock so you can just walk in. They have also built a nice little dock area with step ladders and some soaking spots arounnd the edges so you can hang out without having to tread water. The biggest bummer about the whole experience (besides the seeming lack of organization from our coordinator at the Zermatt) was that scuba diving for an hour in a mineral hot spring pool leeched a lot of the pink out of my hair. Saturday morning it was still a pretty pink color, and Saturday afternoon it had changed to a mostly peachy blonde pink. Not that I can hold that against the resort, but if you have pink hair I’d suggest skipping the scuba session… bummer.
 [ A climb up these stairs takes you to the top of the Crater dome. And this view of the valley ]
I’d love to go back to the Zermatt with a group of friends for a getaway or with my family for a reunion. But I’d make sure I was planning my own activity schedule because our coordinator didn’t seem too concerned that we had the best experience possible. Which was kind of frustrating and a little disappointing. And just due to time restraints there was a lot of things that we didn’t get to do. They have mineral hot pots to soak in, a spa, carousel, a full service bakery, golf, ATV’s (half of our group went out on those in lieu of a scuba session) or in the winter you can choose pretty much any sport involving snow or ice or penguins. That’s a lie, no penguins in Utah. Duh.
*This post was made possible by the Zermatt Resort and their association with the Utah Bloggers Meetup Group of which I am a part. Opinions are my own.
Lime Pie Cakes
This was originally posted over on Amy is the Party as a guest post for part of her summer blog party. But I made these again this week and I thought I’d share it here too. They are delicious. Seriously, one of my very favorite treats. Enjoy!

These limey bits of deliciousness are quick and easy, and I usually have everything I need to make them on hand. And they are to die for delicious. They are kind of a cross betweeen key lime pie and cupcakes. Lime Pie Cakes! Perfect for summmer, right? Right.

This recipe originally was for a 9″ graham cracker pie crust, so it makes a very random 8 pie cakes. It’s OK. They are still worth it! You’ll need Nilla wafers, 1 14 oz. can of sweetened condensed milk, 4 egg yolks, and four or five limes. Start by zesting three of your limes into a large bowl. Then juice the limes until you have 1/2 cup of lime juice (3 or 4 depending on size and juiciness). Pour the juice into a bowl with the lime zest and add the sweetened condesnsed milk, and the 4 egg yolks. Mix it together with an electric mixer or a whisk until it is well combined. Set aside. Put one Nilla wafer cracker on the bottom of each lined cupcake cup. Then fill them to about 1/2″ from the top. This filling doesn’t rise as it cooks, so you can fill them up pretty good. Bake in a 350 degree oven for 15 minutes. Let them cool for about an hour, and then put them in the fridge for at least an hour before serving.

Whip heavy whipping cream with a bit of vanilla and a big spoonful of powdered sugar. Then top each piecake with a big dollop of freshly whipped cream. (Don’t be stingy!) Slice your last lime into 8 thin slices for a garnish. To make the curly bit make a cut on each slice from the outside edge to the center. Then twist it and bury it in the whipped cream.

These won’t last too long in the fridge. The crackers get soggy in about 6 hours. If you need to make them ahead for a party leave the cracker crust out, or substitue a graham cracker crust and they should be just fine. They are the perfect sweet and tangy summertime treat!
Blue Blue Monday
Last night was rough. Creamie woke up a million times, ended up in our bed, and was so restless that we both ended up out of our bed. I slept in her bed and Scott had the couch. And when she realized she was all alone in our room she freaked out. And this morning we had a serious talk about where she can sleep when she gets sad in the night and we made her a little bed on my floor. Needless to say, it was not an awesome morning.

Well, she thought it was fine. She picked her favorite cereal for breakfast, and two half finished cups of milk from the fridge and airheads she found in my purse last night. And I let her have them. I’m an awesome mom like that. After she was done I noticed that everything was blue…. so not planned.
But as she was enjoying her candy I was catching up on blogs and read that Sandi Henderson is rereleasing her gorgeous Henna Garden prints. In their own collection this fall. All Henna Garden! It’s amazing, and it brightened up my whole day. You can vote on her blog for your favorite colors to come back and make any suggestions of new combos you’d like to see.

Pretty fabric and gross blue candy is just what we needed over here to perk this Monday right on up.


