October 2012
October has been so busy over here. First Sewing Summit, and then it took a few days to recover and catch up on my sleep. The next weekend we took a long trip together that was much needed. It was so good to just spend time together as a family. And after we came back it was back to the grind and I sewed a few miles on my sewing machine in just two days. More on that later. I’m nearly done with all my Christmas sewing already and it feels so good. I’ve never been this ahead of the game before, I can hardly believe it.

I’ll hopefully get finished going through the Halloween pictures on my camera today. I’ll just tell you it was freaking awesome. And although I do have a little bit of “this-costume-isn’t-handmade” guilt, she picked her costume a few months ago and it was the one where I magically found the perfect pieces I could order online and then it was done. It was nice, but I don’t think I’ll do that next year. I love making Halloween costumes.
Be back soon. I’ve got a lot to share! (And a lot of that Christmas sewing which I can’t share for months!)
Sewing Summit
Last night I got home from spending four days in the Little America Hotel in Salt Lake City with a group of fantastic and amazing women. I made some wonderful new friends, ate a lot of brownies, didn’t get any sleep, and didn’t sew a stitch. But working on the Sewing Summit staff with Erin, Ali and Megan was one of the most amazing things I’ve ever been a part of.

Last Wednesday, the day before Sewing Summit began was one of the worst days in a long long time… it started with the mechanic telling me I needed four new tires, somewhere in the middle I got pulled over and got a ticket, while on the freeway driving to SLC to start work on Sewing Summit organization stuff a semi kicked up a rock and chipped my windshield. And then I realized I had left a very important bag of stuff at home by the couch and had to drive all the way home to pick it up. Sigh. Awesome, right? But after that things got much better. (Except the next day we had to buy 2 new tires for our other car. Lame. Did I mention I had to buy a new phone last week too? And we have to replace a broken window this week as well? Seriously. I think there’s a saying about raining and pouring that should go here…)
But starting Thursday morning I threw myself into work and didn’t stop until yesterday afternoon. It was happy and rewarding work. But I am exhausted. I feel like I could sleep for 24 hours before I am really caught up. But instead I am off to buy new tires, mail 29 boxes full of fabric and goodies home for those people who ran out of space in their luggage and snuggle and play with Creamie. And something about grocery shopping and laundry will need to work it’s way in there too.

See you soon.
Morning Makeover
Late last night I was at the grocery store trying to get everything ready so I can be gone for four and a half days. I shouldn’t ever go to the grocery store alone. I have all this “time” to browse every aisle and look at stuff I’d never take the time to look at when I have a small person with me.

But last night I was at Walmart and saw these black mocs for $12. And they were almost cute, but not quite. So this morning I cut the black bow off, trimmed the fringe a bit and tacked it down on the edges so it didn’t stick up quite so much. Then I tied a scrap of pink ribbon in a bow and I’ve got myself a much cuter pair of mocs for all my late night making stuff sessions. Not bad for $12. Next on my list is painting my toes and buying jellybeans. Important stuff right there.
Down to the Wire
Well friends, Sewing Summit starts in just two short days. I am plugging away at my to do list. I am ridiculously thankful that Scott had a paid holiday today so I could get a lot of things done without parking Creamie in front of the TV all day. She had a great time playing with him all day. And I successfully threaded my serger without crying and then hemmed 20 tablecloths.

Today I made a pretty vintage sheet bunting that is going to be given away in a bunting swap at Sewing Summit. It felt good to cut into a few of the pretty sheets I’ve been saving and hoarding for so long. One of my goals on my 30 before 30 list was to sell pieces of my sheet collection. And as soon as Sewing Summit is over I am going to start slicing and dicing them into kits. I’ll do some bunting kits, some fat quarter bundles, and probably some larger 1/4 yard strip kits. I’ll get myself together here as soon as I recover from the next week.

So, I don’t embroider. Like at all. But I want to learn, so on Saturday while I was working at my quilt shop job I asked the lady I was working with to give me a lesson. She is amazing. And before I left I had a good start on a small simple project. On Sunday I was sitting on the couch working on it some more and Creamie got all excited about doing her own stitching. And after lunch we tried it. You guys. She did amazingly well. I mean, she got distracted easily, and had to stop for snacks, but before she went to bed she had stitched her own little flower. All by herself. I helped her get the needle up from the bottom in the right spot, but everything else was all on her own. I am ridiculously proud. And I am framing this little flower. Today she started another project, her name in rainbow letters. And this time she is doing the whole thing herself. Her tiny little three year old fingers are coordinated enough to push her needle back up from the underside with only 1 thread between the end of her last stitch and the beginning of the next. She amazes me.

This is my small project. It’s my first successful embroidered anything. (This pic was taken before I added the satin stitches on the beaks, and a worm in the mamas mouth.) The pattern is from Aimee Rae‘s book Doodle Stitches. Which is lovely, I’ve spent a happy few days browsing through it. Ok, back to the todo list. And I’m gonna work a little ice cream and warm cookies in there somewhere.
September
A few days late, but this September was kind of awesome. I finished a lot of projects, we went camping two weekends in a row, Creamie rediscovered her love of painting, I picked a million raspberries and it finally started to cool off at night so I can open the windows and turn off the AC. And we celebrated two birthday’s which meant homemade chocolate cake two weeks in a row.

October is already shaping up to be super beyond busy. Like seriously. Have you heard of Sewing Summit? Yes? No? Well it’s an awesome sewing conference here in Utah, SLC to be specific. And I’m on the staff. I don’t expect to come up for air until the 15th at least. And then it will be Halloween costume time. And I’ll need to do something about all those school clothes I was going to make, got distracted and they are still in piles of fabric + pattern + thread/notions on my dresser. Scott loves that. HA!
Everyday is a Gift
There are a lot of things I am not doing right now. It’s a conscious choice. When I get overwhelmed I start to shut down, and the only real way for me to prevent that is to shut down the things in my life that aren’t contributing to my overall happiness. I am still making stuff. I am done with facebook. I have been sewing everyday. I don’t always clear off the dining room table for dinner. I shower. I don’t blow dry my hair.

I’ve realized my favorite way to document the things I am eating is with a round plate/bowl. In a straight shot from above. Thank you Instagram for teaching me my favorite way to show you I ate a chocolate muffin for breakfast one day, and cake four days in a row.
I am eating a lot of good things. When I am stressed I like to make stuff. Particularly bake stuff. It happens, whatever. I am not eating enough vegetables (that one is not really conscious, it just happens sometimes). I am trying new things. I am spending time with my family. I am clearly not blogging about all those wonderful things I am doing or making. I am not reading many blogs either. I don’t watch the news. Or TV in general. I avoid politics and any place politics might be discussed like the plague. I am opening my windows because fall is awesome. I am suffering horribly from allergies. Which makes fall much less awesome and winter SO much more appealing.

I tried this PB+Honey+Banana milkshake today. It was amazing. I had two. I don’t feel bad about it. I am making lists and writing down goals and plans and projects. I am not sleeping well. I started to watercolor. I love it. I stopped worrying about my house being clean. I still do the laundry. I am not washing the tub. But I do clean the toilets. I am trying to appreciate the everyday. Because everyday is a gift. I’ll be back soon.
Joining the Hexagon Craze
When I was a little girl I remember seeing a grandmothers flower garden quilt on someone’s bed, or maybe it was just a picture of one, but I remember thinking I wanted to make one someday. Then I found out that they are done completely by hand. Oi. (I found this out when I was 12 or something, not when I read that post, but it has some great pics of a beautiful flower garden quilt.) I shoved that idea to far reaches of my brain for a really long time. And then last year I saw Leigh’s work in progress hexagon quilt. And Amy Smart has been talking about hexies on her blog for forever. And then at the beginning of this summer I got an idea and started my first hexie project. It is at a standstill. (Because I seriously SUCK at embroidery, which is not really related, but related. You know? It’s complicated. We are taking a break right now. Seeing other… stitches.) But whatever. I’ll finish it one day. And in the meantime, I did something else.

A few weeks ago Leigh taught a class at a SLC Modern Quilt Guild meeting about English paper piecing, which is how you make and sew hexagons together. And I got so excited about it I ordered some tiny hexagon papers and started stitching. And in one very sick day on the couch I had made these 6 hexies. All together this ring of six is just a hair over 6″ across. These are 1/2″ hexagons and they are tiny. I also ordered 1/4″ hexies. Tinier. (FYI: Hexagons are measured by the length of each side.)
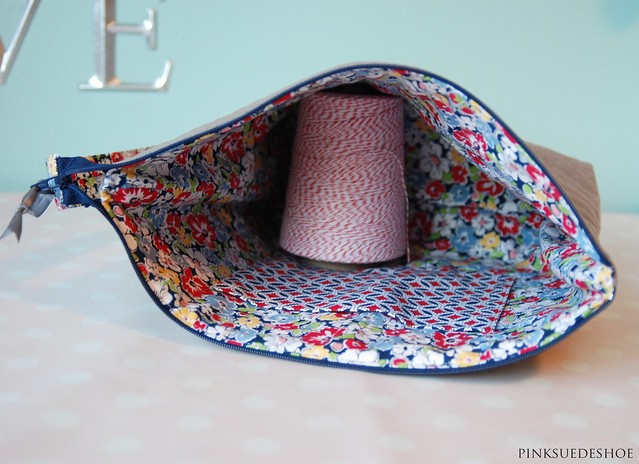
A few weeks before that I had seen this floral fabric at JoAnn that reminded me so much of a Liberty of London print. And when I think of Liberty of London I think of Amy Smart. We met through blogland a few years ago and are now real life friends. She is such a wonderful down to earth person, who is also fabric crazy. A perfect combo in a friend. (In June when we got this news Amy was the one who let me stand on her driveway and sob like a crazy person and she gave me a hug and I didn’t feel stupid. That alone should get her some serious points in that place they keep track of all the points.) Anyway, I saw the fabric, it said Amy Smart all over it and I knew I was going to make her a little zipper pouch for projects. She always has handwork with her, I wish I was so organized… And then the hexagon inspiration came, and then Anna’s big wide zipper pouch tutorial. Throw in a little gray linen I was test driving for myself, an interior pocket and a bit of rainbow hand quilting and I had a game plan.
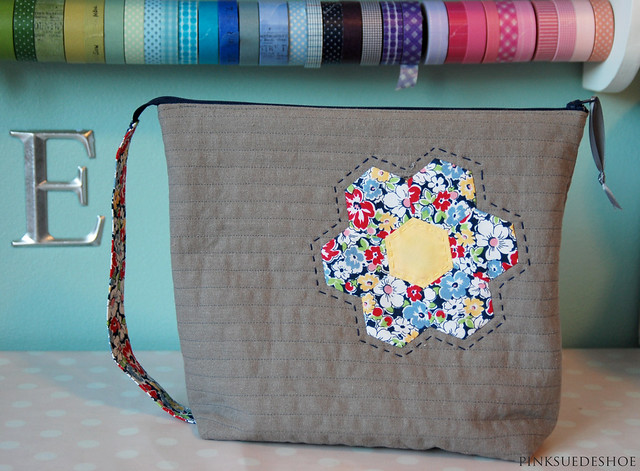
These hexagons on the back are 1″-ers. Much easier to work with, but you know how things that are tiny are just cuter? Yes. They are. I added the handle using this tutorial from my friend Colleen. It is the next best thing to having a big wide zipper bag. Truly, I’ll never make this bag for myself without it again. Or without a pocket inside. Important stuff here.

Before I stitched the bag together I quilted straight lines on the gray linen and then stitched each hexagon in place by hand. And then I decided to hand quilt around the edges in a rainbow. And in the end this bag turned out to be probably my most favorite thing I have ever made. It was almost hard to give it away. But in the end I knew that I could never look at it without thinking of my sweet friend Amy. Also this project magically came together much better than I ever could have dreamed. And you don’t mess with that kind of good sewing karma. No, you don’t ever mess with good sewing karma.

I gave this to Amy a few weeks ago. The best part about it is that she has been using it. For it’s exact intended purpose: to hold her latest hexagon project. And that makes my heart happy.
I have some more things to share. I am almost into a new routine with our new fall schedule. (Which I am telling you from my computer at 3am… clearly not part of the fall schedule). It still kicks my butt most days (even when I go to bed at a normal time) and then I feel totally justified in making brownies and a side of quesadilla with chicken nuggets for dinner. Or breakfast at 1:00 pm. It’s been a rough transition. We are taking baby steps here friends. Baby steps. Be back soon.
Cuddle Quilt for Creamie
A few months ago my friend Emily Herrick of Crazy Old Ladies released a book called Geared for Guys which is full of quilt patterns specifically for men. She has some great patterns in there, and nothing too frilly or foofy. Manly colors, geometric shapes and clean modern lines. And today I am kicking off her G.f.G. Remix tour, where twelve of us have used her manly man patterns and made a not so manly man version.

I used green and pinks and blues to make a small cuddle quilt for Creamie. She loves it because it has four colors of blue and I love it because it was so quick and easy to put together. Win-win all around! It wasn’t until I had uploaded the pics and was writing this post that I thought I should have put another stripe of dark pink on the very bottom instead of the blue… ah well, I’m not changing it now. And Creamie probably prefers the blue anyway. You know, blue is kind of her thing.

The original quilt, called High Voltage, is 60″x80″ but I adjusted the measurements and only made this quilt a quarter of the size of the original pattern. Then I added the two borders to the edges, and my quilt finishes at 42″x49″. It would be a good baby size quilt, but I’m going to give it to Creamie so she has her own snuggle blanket. Not long ago I realized that of the dozens and dozens of quilts I’ve made, she doesn’t have one of her own to snuggle and cuddle and drag around the house. That is about to change.

I am going to use this sweet chevron print for the back and bind it in a solid pink to help pull everything together. I am really hoping I can get this one done soon. I think I am going to try and quilt it myself… we’ll see if that actually happens, I’m in full swing Christmas sewing mode already, and I’ve got to throw some Halloween costumes in there somewhere as well. I hope I can manage my time well enough in the next two weeks to have this one completely finished and on it’s third or fourth trip through the washing machine due to excessive loving.

Thanks Emily for such a great and versatile pattern! You can buy her Geared for Guys quilt book with this pattern, plus 7 others from her etsy shop, and she has a digital version as well, which means no shipping! Yay! In the next two-ish weeks eleven other talented quilters will be showcasing their versions of Emily’s patterns in the Geared for Guys Remix tour.
Sept 4: Me, right here!
Sept 5: Lisa from Love to Color My World
Sept 6: April from Making Ends Meet
Sept 7: Vickie from Spun Sugar Quilts
Sept 8: Sinta from Pink Pincushion
Sept 9: Marion from My Quilt Diet
Sept 10: Sherri from A Quilting Life
Sept 11: April from Prairie Grass Patterns
Sept 12: Tricia from Notes of Sincerity
Sept 13: Shannon from It’s Sew Shannon
Sept 14: Shari from Doohikey Design Studio
Sept 15: Michael from Patchwork and Paper
Sept 16: Author and designer Emily Herrick to wrap things up and a giveaway.

August 2012
Summer is almost over. It has rained a few times in the last little while, I really hope that means the crazy town heat wave has moved on. Creamie is back in school and we are both loving it. And last Sunday I made my first pumpkin pie of the season.

Now if fall could hurry up and be over so my fall allergies were gone that would be great. I’m already working on Christmas projects. Yay!
New Projects
One of my goals for this year was to do a 30 day project. I didn’t really have anything particular in mind, but last weekend I hit upon my idea. And then randomly started it in the middle of a month. I recently read this post and this post and decided I would like to practice my handwriting. When I was a little girl it was terrible. And one summer I practiced for an hour and a half everyday to go from chicken scratch (inherited from my father, haha!) to legible. My mother has beautiful handwriting. And one day I’d love for my handwriting to be beautiful too. So I need to practice.

This was a bit of advice I sent to a friend in an email last week, and it has just stuck with me. It’s some advice I should give myself a lot more often. I just bought a new notebook, and I don’t know exactly what each page is going to look like yet, but I hope that by the end of September it doesn’t take me nearly so long to write 14 words. HA! Like most people, if I take my time, my handwriting is much nicer…. and what I really want to improve is my regular old everyday handwriting. The faster I go the sloppier it gets. And it bugs me. I was one of those people who rewrote their notes all through college, just so they looked pretty. I’m not going to post writing pictures everyday, probably a weekly roundup for the next little while or something. If you want to join me feel free. There aren’t really any rules, just practice writing something each day, try out new fonts, improve your signature, dot the i’s with hearts. Whatever.


